After a solid two-year hiatus, here’s a new progress report for the Zelda: Link’s Awakening disassembly! Here we’ll cover the changes that happened in the past two years.
First let’s congratulate the following new contributors, who made their first commit to the project during the past two years:
This series of articles moved to a new blog! Instead of being hosted on kemenaran’s personal blog, interleaved with other content, they are now published on this dedicated website. Of course, the former URLs now redirect to these new pages.
This move makes subscribing to new articles easier, since only relevant Link’s Awakening content will be published. I hope it will also encourage a more collaborative process for getting these articles out.
Also, the source code of this website is public! If you notice a typo or something missing, feel free to submit a pull request. Contributing right from Github’s UI usually works well, without the need to fork and run the website locally.
The biggest addition of Link’s Awakening DX, compared to the original monochrome version, is of course color.
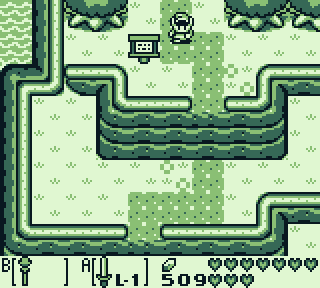
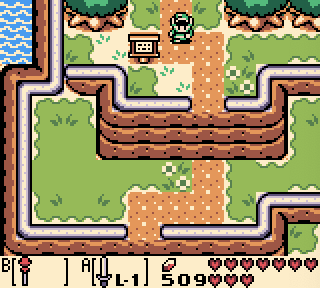
Comparing the original and colorized overworld.
Unlike modern games, these colors are applied not by coloring each individual pixel — but by using a fixed set of color palettes.
Each palette has 4 colors. And at a given time, the game can use 8 palettes for the background, and 8 palettes for the sprites.
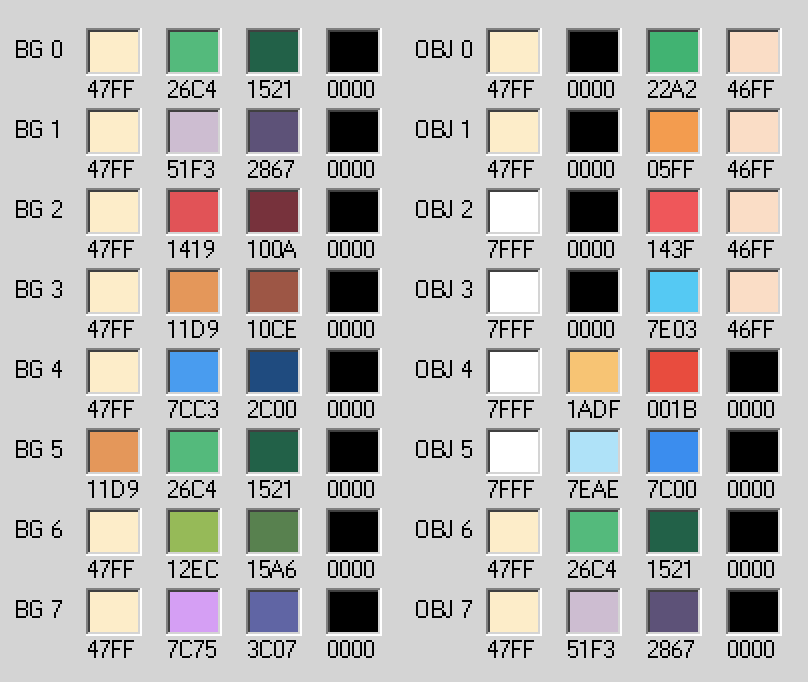
The palettes used for the overworld screenshot above.
But this wasn’t well reflected in the disassembly until now. Color palettes were represented in a binary format, matching the underlying hardware, but difficult to read and edit by humans.
ObjectPalettes:
    ds  $FF, $47, $00, $00, $A2, $22, $FF, $46
The OBJ0 palette, as it was appearing in the source code.
Kelsey Higham wanted colors that were easier to read. After a bit of collective macro writing on the Discord server, the final format she ended up with reads like standard RGB hexadecimal colors.
ObjectPalettes:
    rgb   #F8F888, #000000, #10A840, #F8B888
With this new format, the same OBJ0 palette is much easier to edit.
There’s a fair amount of hairy macro code at compile-time to convert these #RGB colors to a two-byte GBC color. But the result is very pleasant to read: hexdecimal RGB colors are used everywhere, especially on the web, and many color editors can import and export from this format.
Then Kelsey Higham started the daunting task of converting all color palettes of the game to this format. Quite a task — but the end result is worth is: as far as we know, all color palettes in the source code are now decoded.
And the #RGB format has another advantage: as it is so widely used, many text editors can display the described color right in the editor itself.
Look at the result:
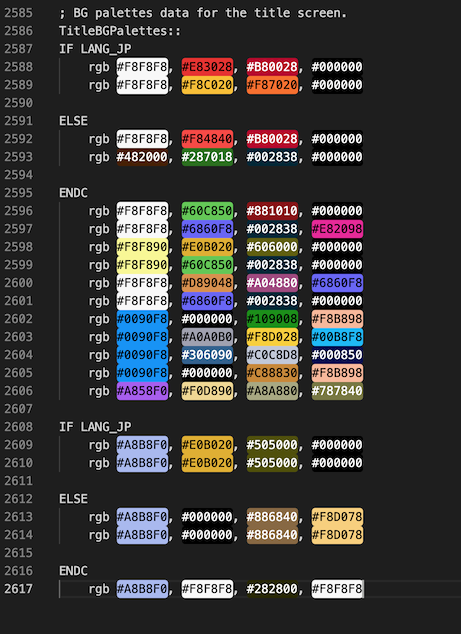
Visual representation of the game palettes in VS Code.
Now that’s a really easy way to see the content of a palette, right from the source code.
To display large pictures or sceneries, Link’s Awakening DX uses tilemaps (like almost all Game Boy games do). Tilemaps store the indices of tiles in a large array, and can be easily displayed by the hardware.
Except that Link’s Awakening DX doesn’t use raw tilemaps, but somehow compresses them. Instead of a linear sequence of tile indices, the game stores what we call Draw Commands. These little chunk of data instruct the decoder to “paint” the tilemap with a specific tile.
This hand-written compression helps to reduce the size of the tilemaps. For instance, if a tilemap is mostly black, but with a tiny patch of repeated details in the middle, the game can simply instruct to paint a row or a column of detailed tiles, and ignore the rest of the tilemap (which will use the background color).
To read more on encoded tilemaps, see the relevant entry in a previous progress report.
User @Javs on Discord reported an issue occurring when editing the tilemap of the File creation menu. When decoding, editing and then re-encoding this specific tilemap, the tile indicating the save slot number would disappear.
On the left, the original version.
On the right, the edited version, lacking the save slot number 2️⃣ on top.
Now why did that happen? Turns out it was a combination of different issues.
The first thing we tried was to disassemble the relevant code.
When displaying this specific screen, there are two loading stages before the screen becomes interactive:
Then the game simultaneously:
requests the file creation tilemap (and attrmap) to be loaded during the next vblank,
and requests a specific tile to be written to the BG map during the next vblank: the save slot index.
So far, so good. Now why doesn’t this work anymore when the tilemap has been edited?
A possible cause of problems is that Link’s Awakening tilemaps use a custom compression format, where repeated tiles can be “painted” over the screen. And most of the time, these compressed tilemaps were handwritten. So when we decode and re-encode a tilemap, there’s always a difference in how the compression is expressed (because the automatic encoding program doesn’t make the same choices as the original artists). In the end, the re-encoded tilemap is supposed to be functionally equivalent.
But could the different encoding trigger some underlying issues, like a race condition? What if the original encoding wrote to the top of the screen first, but the new re-encoding wrote to the top of the screen last, overwriting the changes made manually to the BG map?
Turns out the issue was simpler than that.
To save space, the original tilemaps often don’t encode the bytes for the background color. Instead they first fill the whole BG map with black (or white) tiles, then “paint” the tilemap over this background color. This is precisely what the File creation BG tilemap does: it only paints the bricks and letters, not the black areas.

The original tilemap only draws the tiles different from the background color.
When decoding the tilemap, we want the result to be editable using an external tool. So the decoder does the same steps: filling the background with a default color, and then painting over. Which means the background color gets included into the decoded tilemap.
But when re-encoding the tilemap, the background color was also imported into the file. Which resulted in the tilemap containing draw commands for all the black background areas.
But an edited tilemap would draw on the whole screen, including over the background tiles.
This is not only wasteful, it also means that the game paints the tilemap bytes twice: once when filling the Background with the default color, and once again when reading the tilemap.
And that was our issue: the game filled the background with black, then wrote the tile for the save slot number and painted the tilemap. As the save slot number is written over a black tile, it wasn’t overwritten by the original tilemap. But it was by the re-encoded version.
In theory, fixing the issue was easy: we just had to ignore the background color when re-encoding the BG map.
That said, the actual fix took some evenings. The encoder didn’t had any proper compression scheme implemented (all bytes were always written sequentially), but to allow some bytes to be skipped, a proper implementation of writing only to certain regions was needed. This also uncovered several bugs in the decoder part, which had to be solved.
In the end:
And here’s our fixed version in-game:
The edited File creation tilemap, with the save slot number correctly displayed.
A remaining caveat is that, for now, the background color has to be specified manually, both when decoding and encoding the tilemap. For instance:
# Decoding
tools/convert_background.py decode src/data/backgrounds/menu_file_creation.tilemap.encoded --filler 0x7E --outfile src/data/backgrounds/menu_file_creation.tilemap
# Editing using an external tool
# …
# Re-encoding
tools/convert_background.py encode src/data/backgrounds/menu_file_creation.tilemap --filler 0x7E --outfile src/data/backgrounds/menu_file_creation.tilemap.encoded
But hopefully this is something that can be defined by the file name at some point.
The disassembled code has been shiftable for quite a while now. That means it is possible to add or remove some code, build the game, and have things still working: all pointer addresses that used to be hardcoded now resolve to the new locations automatically.
But at the beginning of 2022, there were still issues with the RAM shiftability: adding, removing or moving some variables in memory would break various things in the game.
Now, after a good number of fixes, the RAM is now properly shiftable.
For instance, you can add a block of 5 bytes at the beginning of the RAM definitions (thus shifting all RAM addresses by 5), and the game will still work properly. Or, to free up some space, a developer may choose to move a big block of RAM data out of RAM bank 0 to another RAM bank: this is expected to work without too much work.
All of this makes extensive ROM hacks possible: for instance, theoretically, it opens the gates to increase the maximum number of entities, or the number of letters reserved for the player’s name.
Entities are the various NPCs, enemies, and actors that form the dynamic elements of the game. The game has more than 200 of these entities, and they make up a good part of the entire game code.

Yes, there are that many entities in the game.
Each of them can require thousands of lines of code.
In the original source code, we have good reasons to believe that the entities code was grouped in a handful of source files.
./entities
├── entities3.asm
├── entities4.asm
├── entities5.asm
├── entities6.asm
├── entities7.asm
├── entities15.asm
└── entities18.asm
└── entities19.asm
└── entities36.asm
How the original code was probably structured.
But to make the code easier to browse and to understand, the disassembly attempts to split the code of each entity into its own source file.
./entities
├── 03__helpers.asm
├── 03_arrow.asm
├── 03_bomb.asm
├── 03_droppable_fairy.asm
├── 03_hookshot_hit.asm
├── 03_liftable_rock.asm
├── 03_moblin.asm
├── 03_octorok.asm
└── …
How the disassembly attempts to split the entities each into their own file.
These splits are not straightforward: the entities’ code is not cleanly isolated, but instead references a kind-of-standard set of helper functions, duplicated into each original file. Sometime an entity will even use some code from another entity in the same file!
So this is still very much a work in progress: at least one file needs to be split, and the file structure is not final yet. But it progresses steadily.
Daid took some time to research and document the ways entities sprites are defined and loaded on each room transition.
As the Game Boy video memory is quite limited, management of graphical resources is quite important. As for the NPC sprites, the game had a few challenges:
After a lot of research, this ended up in a large PR documenting the sprite-slots mechanism, and a higher-level wiki article on this topic.
![]() The four spritesheets for room 07 on the Overworld.
The four spritesheets for room 07 on the Overworld.
To summarize the key points of the sprites resource management:
That’s the gist of it – but of course there’s more.
For a more detailed read on this topic, and details about how the following NPCs interact with this system, head to the sprite-sheets article on the wiki!
Often, in the code, we need to turn a numerical value into a constant.
For instance, there may be a lot of patterns like this:
ld   a, $08              ; load the constant "08" into register a
ldh  [hMusicTrack], a    ; write the content of a to the variable hMusicTrack
There may be dozens of similar uses of hMusicTrack in the code.
At some point, someone may identify the meaning of all these numerical values:
MUSIC_NONE                              equ $00
MUSIC_TITLE_SCREEN                      equ $01
MUSIC_MINIGAME                          equ $02
MUSIC_GAME_OVER                         equ $03
MUSIC_MABE_VILLAGE                      equ $04
MUSIC_OVERWORLD                         equ $05
MUSIC_TAL_TAL_RANGE                     equ $06
MUSIC_SHOP                              equ $07
MUSIC_RAFT_RIDE_RAPIDS                  equ $08
MUSIC_MYSTERIOUS_FOREST                 equ $09
; …
Good! But it now means that we need to look up all usages of hMusicTrack, and manually replace the numerical value by the proper constant. Tedious.
Luckily, @daid wrote a generic tool to make this task easier: the peephole replacer.
This tool can read a list of constants, a code pattern to look for — and then scan the whole code for this specific pattern.
In our case, we can use the peephole replacer with the following declaration:
PeepholeRule("""
    ld   a, $@@
    ldh  [hMusicTrack], a
""", read_enum("constants/sfx.asm", "MUSIC_"))
Now invoking ./tools/peephole-replace.py will detect all uses of hMusicTrack in the code, and automatically replace the numerical value with the proper constant.
ld   a, MUSIC_RAFT_RIDE_RAPIDS
ldh  [hMusicTrack], a
Of course this has been used with many other constants as well (sound effects, entity flags, etc.). The peephole replacer can even perform more complex operations, like expanding the values of bitflags:
; Before running the peephole replacer, with a raw numerical constant
ld   hl, wEntitiesOptions1Table
add  hl, bc
ld   [hl], $D0
; After, the bitflag is properly decoded
ld   hl, wEntitiesOptions1Table
add  hl, bc
ld   [hl], ENTITY_OPT1_IS_BOSS|ENTITY_OPT1_SWORD_CLINK_OFF|ENTITY_OPT1_IMMUNE_WATER_PIT
A disassembled game is a great tool for fan-translations. Compared to ROM hacking, the script is easier to edit, and doesn’t require to relocate text pointers manually. Plus any language-specific features can be hacked in relatively easily.
So it’s no surprise that a handful of fan-translations started popping up (as seen in the next section).
Each translation has to go through all the dialog files. However, in these files, the dialogs are unordered, and out of context: there is no indication about where a specific dialog line or text is used. And looking up the dialog reference in the code doesn’t always work (because of dialog identifiers generated dynamically).
Fortunately, Kelsey Higham decided to improve this situation – starting with the speakers’ names. Now, beside almost every dialog line, a comment indicates which character or entity uses the line in the game.
Dialog19B:: ; Schule Donavitch
    db "Ya, I am Schule "
    db "Donavitch!      "
Some lines are easy to attribute to a specific character.
Dialog27A:: ; Marin
    db "Whew!  What a   "
    db "surprise!@"
Without context, that one would be less clear.
Now even the most obscure lines can be traced back. And it greatly helps to imagine the line in context, and translate it properly.
The toolchain used to compile the Game Boy code, rgbds, is surprisingly active. Every year or so, its assembler, linker and tools get new features – and sometimes new deprecations. rgbds 0.6, released in October 2022, introduced a handful of breaking changes.
Modders are usually keen to work with the latest version of the toolchain. So @tobiasvl took on the task to fix the code for the latest assembler version.
But before that, a handful of issues needed to be resolved:
rgbgfx, the tool used to convert PNG files to the binary Game Boy image format, got an upgrade – but it broke the auto-detection of some color palettes. ISSOtm, the maintainer of rgbds, ensured that all PNG files in the source code have their grayscale palette properly detected.And finally, @tobiasvl messed with the Makefile, which can now pass the correct compilation flags to both older and newer versions of rgbds.
Most disassembly projects are presented as a bunch of text files, with barely any of the interactive tooling. A bare-bone syntax highlighting when lucky — but no navigation, code structure or type inference one can expect when working on modern languages.
This is where disassembly IDEs fill a gap. Instead of text files, they present an interactive and navigable view of the code. They also usually feature an integrated disassembler, pictures rendering, ties with an emulator for live code inspection, and so on. A notable example is DiztinGUIsh, a disassembler for Super NES games.
Until recently, no such IDE existed for Game Boy disassembly projects. That is, until jverkoey started working on his project.
Enter the Windfish interactive Game Boy disassembler.
Syntax highlighting, navigation, memory regions, emulator, debugger: this GUI has it all.
Windfish can disassemble a Game Boy ROM, but that’s just the beginning. It is an interactive tool to explore the code, understand how it works, and document the various routines and memory locations.
One of its main features is that it integrates a tracing disassembler: it doesn’t just print the disassembled code, but attempts to simulate the execution, so that it can follow the code. And in the end, everything that has not been traced to executable code is probably data.
Windfish can also associate a memory region to a picture type, so that it is known that this memory represents tiles. Or it can recognize some code patterns, and generate RGBDS macros.
There are many more things to say about Windfish: how it has some neat coding tricks, documented in the Architecture description; how it integrates with the SameBoy emulator for a live exploration of the code; and so on.
The project is written in the Swift language, and runs on macOS. The core libraries (invoked from the command line) should theoretically work on Linux and Windows though. It still has some rough edges, but all the hard computer-science foundations are definitely present. That makes it one of the most promising tools of the scene.
The disassembly, even in its unfinished state, made several romhacks possible (or at least way easier). Here are a few of them!
Among these projects, Daid’s LADX Randomizer holds a special place. While this randomizer is not directly based on the disassembly (internally the ROM is edited using binary patching), the disassembly is instrumental for its development. Daid also contributes its findings to the disassembly documentation.
A few months ago, the high-level engine documentation was featured on Hacker News, and widely appreciated. Since then it didn’t get much more content though. Some missing sections could clearly be extended.
Code-wise, the main missing areas are still the physics engine and the entities code, which are fully disassembled but not documented yet. A good point of focus for the next months!