The big news of this progress report is that the disassembly is finally standalone: it doesn’t require the original ROM anymore to fill out uncompleted sections. The project can now be built entirely only from its source code.
Why wasn’t that done before? After all mgbdis, the most-commonly used disassembler, can generate a valid disassembly of any Game Boy ROM in ten seconds.
So what took so long?
First, at the time this project begun, mgbdis didn’t exist. So the project started with a custom-made disassembler, written in C.
As a work-in-progress, support for less common special cases was added progressively to this disassembler. Which means it was tested first on a few sections of code – hoping that progressive improvements would allow it to generate the entire disassembly.
But instead, this custom disassembler slowly bitrot.
Enter mgbdis: a pretty nice generic disassembler, that guarantees it will always generates valid code that can be compiled back to the original ROM. Awesome! We can now apply it to our game, have it entirely disassembled, and commit the result to the project, right?
The problem is that some sections were already decompiled using the custom disassembler, which uses slightly different conventions. How to make these existing sections match the mgbdis output format? We won’t want to re-generate these sections from scratch: there are already heavily documented, with labels and annotations in comments.
In the end, the most sensible way to produce a good disassembly was to improve mgbdis itself, so that it would be useful even when working with an existing partial disassembly. This meant:
mgbdis to read labels from debug symbols, and use these labels when generating the disassembly;In the end, it was possible to generate the entire disassembly using mgbdis, while respecting the existing code, symbols and formatting conventions. Then it was just a matter of copying the code into our partial disassembly, section by section – having just to fix up a small number of remaining errors on the way.
Very good, but not entirely satisfying.
You see, one of the initial tasks when working on a vintage game disassembly is separating code from data.
Most cartridge-based games of the early days don’t have a file system. Everything is compiled into a single binary file (usually called a ROM)1.
So when trying to figure out how the game work, there are no separate files in the ROM – and usually no metadata to tell us which parts of the binary are compiled code, 2D-textures, 3D-models, animations, maps, music… All we have is this large binary file, and we must try to sort out code from data.
A basic solution to this problem is to interpret everything as code. When generating a disassembly, let’s just consider every byte to be a valid code instruction. This is exactly the approach of mgbdis.
Every time a new section of code was copied from the mgbdis-generated disassembly, we knew that a large part of this code was probably actually data. And it felt inelegant to just insert these wrong segments of code into the project. Shouldn’t we sort out code from data before inserting them into the project; at least roughly?
This is why the integration of the mgbdis-disassembled sections was slow: before generating each section of code, it was manually scanned to guess which sections would actually be data. Many sections were integrated to the projects using this process, but it was tedious and slow.
Fortunately, some people tried to find solutions to automatically sort out code from data.
A partial solution for sorting out code from data is to use a profile-guided disassembler. The idea is to play the game in a special emulator, which records every instruction executed to a game profile. Then a disassembler can use this profile to mark every executed instruction as code – and all the other as data.
The issue with this, of course, is that any missed code path will be interpreted as data. If during the profile-recording the player misses a gameplay branch, the code for this branch will never be marked as executed. And so this code will be turned into data by the disassembler.
If only we could know which code paths are executable, without having to play through every branch of the whole game…
That’s exactly the idea behind tracing disassemblers. Instead of being guided by the game being playing dynamically, a tracing disassembler will read the ROM statically, without actually executing it. But it will try to follow the flow of the instructions, one by one, and mark all the reachable bytes as code. In the end, all the possible branches should be traced – which means that all the remaining bytes are data.
Of course, this means a tracing disassembler must be good at following code paths. If some code path are missed, they will incorrectly appear as data instead. And following code paths can prove quite challenging.
The easiest case, of course, is easy: start with the entry point of the ROM, and follow instructions from there. For instance, with simple instructions:
EntryPoint::
    ld   a, $30        ; $0100
    ld   [rP1], a      ; $0102
    ld   a, $01        ; $0104
    ld   [rKEY1], a    ; $0106
Great, so we know that bytes $0100 to $0108 of the ROM are actually code (and not data).
When an unconditional jump occurs, we can simply mark the target address as being executable – and continue the tracing from here. For instance, continuing from the previous example:
    ld   [rKEY1], a    ; $0106
    jp   $0120         ; $0108
So we know that byte $0108 is really code – but also that the jump target address, $0120, also holds some executable code. And the tracing can continue from there.
And when the code reaches a conditional jump, then both the target address and the next instruction are marked as executable. The disassembler will then trace one of the code paths until the end, then remember to follow the other one later.
    ldh  a, [$FFF1]     ; $0120
    jp   z, $0200       ; $0121
    xor  a              ; $0124
    ldh  [$FFF1], a     ; $0125
In this case, when reaching the instruction jp z, $0200 (i.e. “jump to $0200 if the result of the previous operation is zero”), two addresses are marked as executable: the jump target address, $0200, and the next instruction taken if the branch is not taken, $0124.
Here start the issues.
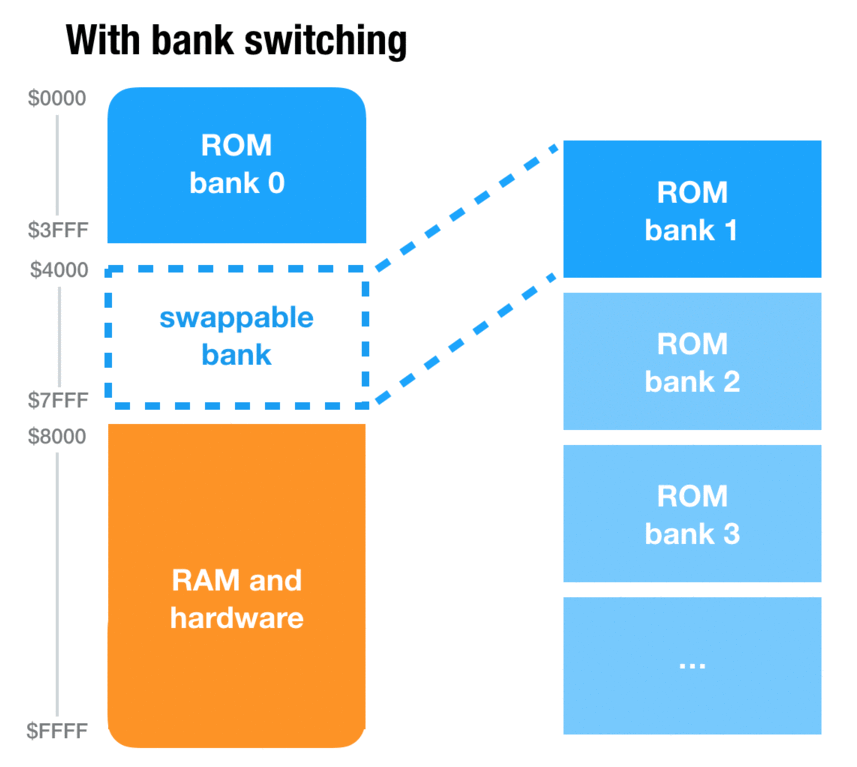
Older consoles like the NES, Super NES and Game Boy have this concept of banks. Banks solve a problem that presents itself very quickly when programming a game on these consoles: the addressing space is too small. As pointers are only two-bytes long, the maximum length of ROM that can be addressed in 65 KB. And games can grow bigger than that pretty quickly. Although Super Mario Bros. 1, as a marvel of engineering, takes just under 32 KB, many games will need much more resources to display rich graphics, sounds and behavior. Link’s Awakening DX, for instance, is a 1 MB game.
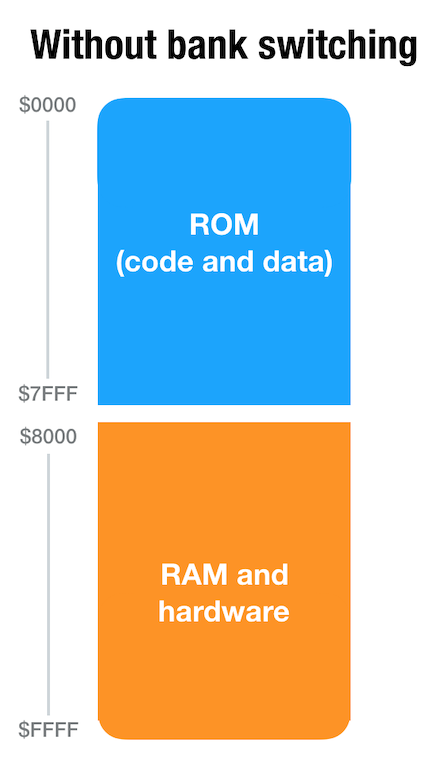
So how was this addressing problem solved? By allowing some of the address space to be swapped dynamically during gameplay. For instance, on the Game Boy, there are two code slots (a.k.a “banks”) of 16 KB: the first one, usually referred as bank 0, is always loaded into memory. But the second one is dynamic: the game can request for bank 3, 4 or 42 to be loaded into memory, and then copy data or execute code from this bank.
Problem solved!2
So banks can be swapped in and out. When reading a game’s source code, it can for instance look like this:
    ; Load bank 2 into memory
    ld   a, $02                             ; $0200
    ld   [MBC3SelectBank], a                ; $0202
    ; Jump to the address $4020 in bank 2
    jp   $4020                              ; $0205
So, taken all by itself, the “jump at address $4020” is ambiguous: it could mean “the address $4020 in bank 1”, or “the address $4020 in bank 5”, or in bank 37 – it all depends on the bank currently loaded. Although here we know by reading the code that the loaded bank will be bank 2.
Which means that, in order to know what an address actually refers to, a tracing disassembler has to know which bank is loaded at the point an instruction is executed.
Fortunately, in the example above, the bank switch is relatively easy to figure out: the disassembler can track when a new value is written to the MBC3SelectBank memory address, and update it’s internal representation accordingly. Although, as you can see, the bank write always goes through an intermediate register (in the example above, a). So to know which value is written to MBC3SelectBank, the disassembler must also track the content of each register. Err, not so easy, but ok.
So now we can trace code jumping through different banks. Good.
Enter dynamic bank switching. Often, the bank number isn’t hardcoded in the ROM: it is figured out at runtime. For instance, some code could be written like this:
    ; If the player in currently indoors…
    ld   a, [hIsIndoor]
    and  a
    jp   z, .outdoor
    ; … use the bank $20
    ld   a, $20
    jp   .endIf
.outdoor
    ; … else use the bank $21.
    ld   a, $21
.endIf

    ; Load bank $20 or $21 into memory
    ld   [MBC3SelectBank], a
    ; Jump to address $4020 in bank $20 or $21
    jp   $4020
So the disassembler has to understand that, at the point the final jump is executed, the target bank can actually have several different values.
And this is the easiest case: the bank number can be further manipulated by a function–or even read at runtime from some sort of table. Great.
In this case, a tracing disassembler may try a combination of being smart (like storing the different possible values for the active bank), or starting to require human assistance. For instance, a human can read the code, and then tell the disassembler that at this specific location, a can only be $20 or $21 (instead of just any possible value).
We’ve seen how the bank number can sometime by dynamically generated at runtime – but the jump address also can.
Often games will read the target address of a jump from an external array (which is sometime called a “jump table”). And sometime the address will even be computed entirely from code.
JumpTargetsArray:
    dw   $4000
    dw   $4100
    dw   $4200

JumpToTarget::
    ; Make `hl` the address of the jump targets array
    ld   hl, JumpTargetsTable
    ; Add the array index contained in `bc` to `hl`
    add  hl, bc
    ; Read the jump target address from the table
    ld   a, [hl]
    ; Jump to the address read from the table.
    ; (Can be either `$4000`, `$4100`, or `$4200`.)
    jp   hl
This is often the nail in the coffin for tracing disassemblers. It becomes very hard to figure out the jump target without executing the entire program. And if the tracing disassembler can’t figure out the target, then all the code accessible from this jump will be flagged as a blob of data, instead of code.
This is generally the moment when some per-game configuration has to be done by hand. Dynamic jumps are not that frequent in a game – and they usually follow a predictable pattern. So, by writing custom recognizers that can identify these formats, the disassembler can read the jump tables directly – and mark all the targets addresses as executable code.
Of course the recognizers to identify the jump table patterns are different for every game. And even in the same game, some dynamic jumps don’t obey to a specific pattern: they must be identified using a single-use recognizer, that will be applied only to a single code location.
So, while this is the end of our dream for a completely automated tracing disassembler, all of this is still useful. Even if some manual work is required, this is way better than manually going through lengthy sections of disassembled output, figuring out where the code stops and the data starts.
Tracing disassemblers for the Game Boy are still experimental. But Discord user @featherless provided the output of a custom tracing disassembly which they are working on, applied to Link’s Awakening ROM.
And the results are stunning: in banks containing a lot of mingled code and data, the tracing disassembler can sort out executable code from other arrays, tables, and data with great accuracy.
So three months ago, when the final rush to finally add the remaining missing banks to the disassembly started, having this traced disassembly made adding the last banks much easier. Of course some manual work had to be performed to match the style of the existing disassembly – but it was way better than identifying data sections by hand.
So the disassembly is now standalone: it can compile back to the target ROM without needing external resources.
More important, the general purpose of each code section is roughly figured out. Instead of a long series of files named “bank35.asm”, “bank36.asm”, “bank37.asm”, most of the files are split and named according to the function of the role they contain (“entities.asm”, “super_gameboy.asm”, “photos_cutscenes.asm”, and so on).
Of cours most of this code is still generated by an automatic disassembler: there are no human-readable labels or documentation about the exact purpose of each function yet. All this work still has to be done. But it will be much easier to figure this out once the large pieces of the puzzle are identified.
For instance, good progress has been made recently on understanding the how entities system works. Hopefully this will be further expanded in the next progress report.
Since the last report, the following people made first-time contributions to the project:
@featherless on Discord, who provided the experimental traced disassembly of the game.This lasted more or less until the advent of CD-based games, which started to use file systems to package the various game assets. ↩
Of course, for game developers, this “solution” of using banks quickly becomes a programming nightmare. Swappable banks mean, for instance, that code can’t jump from bank 2 to bank 3, as only a single non-0 bank can be loaded into memory at once. Writing a routine in bank 4 that copies data in bank 2? Also not possible: these two banks can’t be loaded at the same time.
Every time an operation like this is needed, the code has to use a trampoline: a small piece of code in the bank 0 (which is always loaded) that will swap the banks, execute the target code, and then swap back to the original bank. So code has to be architected around this limitation, which this is usually one of the major hurdle to making ambitious games on these platforms. ↩