After a six-month pause, disassembling efforts have resumed again! And quite a lot got done this week.
Back to December, a surprise contribution arrived from Sanqui. He submitted a pull request containing a clean dump of all the game’s dialogs.
Sanqui even explained how he extracted the dialog’s texts and indexing table from the ROM:
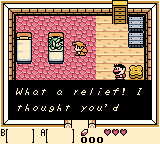
I found the text in the intro (“What a relief!”), set a breakpoint on it, and traced back the relevant code to figure out where the pointer table is. From there I was ready to write a script to dump all the text. :)
He may make it simpler than it sound though: the Python script he wrote is quite a piece of work, and can extract all the dialogs in a readable format.
Anyway you can now browse through the game’s dialog, from Marin’s iconic opening lines to the texts added specifically for the DX version.
There is a lot going on to display these letters on screen.
Beside dumping the dialog’s data, Sanqui also reverse-engineered how the game actually prints a dialog on-screen.
As many things in the game, the dialog system is driven by a state-machine, dispatching the execution according to all the states the dialog can be in.
; Values for wDialogState
DIALOG_CLOSED              equ $00
DIALOG_OPENING_1           equ $01
DIALOG_OPENING_2           equ $02
DIALOG_OPENING_3           equ $03
DIALOG_OPENING_4           equ $04
DIALOG_OPENING_5           equ $05
DIALOG_LETTER_IN_1         equ $06
DIALOG_LETTER_IN_2         equ $07
DIALOG_LETTER_IN_3         equ $08
DIALOG_BREAK               equ $09 ; press A to continue
DIALOG_SCROLLING_1         equ $0A
DIALOG_SCROLLING_2         equ $0B
DIALOG_END                 equ $0C ; press A to close
DIALOG_CHOICE              equ $0D ; press A to choose
DIALOG_CLOSING_1           equ $0E
DIALOG_CLOSING_2           equ $0F
The dialog system takes advantage of an interesting data-transfert system used throughout the game. It allows a function to define an asynchronous data request to update the Video Background data. During the next vertical-blank, this request will be executed by the VBlank handler, which will display the next letter of the dialog’s text.
Also, if you played the game, you probably remember how it is possible to steal one of the items from Mabe’s Village shop.

I wouldn’t advise going back to this shop again.
If you actually do this, your save file will be renamed to “THIEF” – without any way to change it back.
Well, turns out this behavior has been slightly obfuscated: in the code, the characters string "THIEF" is actually stored as 'T'+1, 'H'+1, 'I'+1, 'E'+1, 'F'+1. Which means that for ROM hackers looking at the data, all that will appear is "UIJFG", and no thief to be found.
For a long time, extracting the resources of the game (pictures, dialogs) made good progress–but disassembling the code kind of stalled.
The thing is, only some portions of the code are extracted yet (let alone labelled and documented). And it became more and more difficult to disassemble a new bank. Existing disassemblers were not good enough to produce a workable output, and often lacked the ability to use existing labelled symbols when disassembling a new bank.
I tried for many hours to fix the Python-based disassembler used for the Pokemon Blue/Red disassembly, but I found the code hard to edit and prone to unwanted changes when adding new features.
Fortunately, no more than two months ago, mattcurie released a new Game Boy disassembler, mgbdis, also written in Python. It already took advantages of symbol files to disassemble new banks, and I found it relatively easy to fix some minor issues, edit the output style, and add new features.
After spending some hours tweaking the output, a new bank was finally committed: we have the code for bank 2! This bank contains some part of the audio engine, plus gameplay-related code.
Of course much of it still remains to be documented. But the logic for selecting the music track to be played on the overworld has already been pretty well documented; you can check it out.
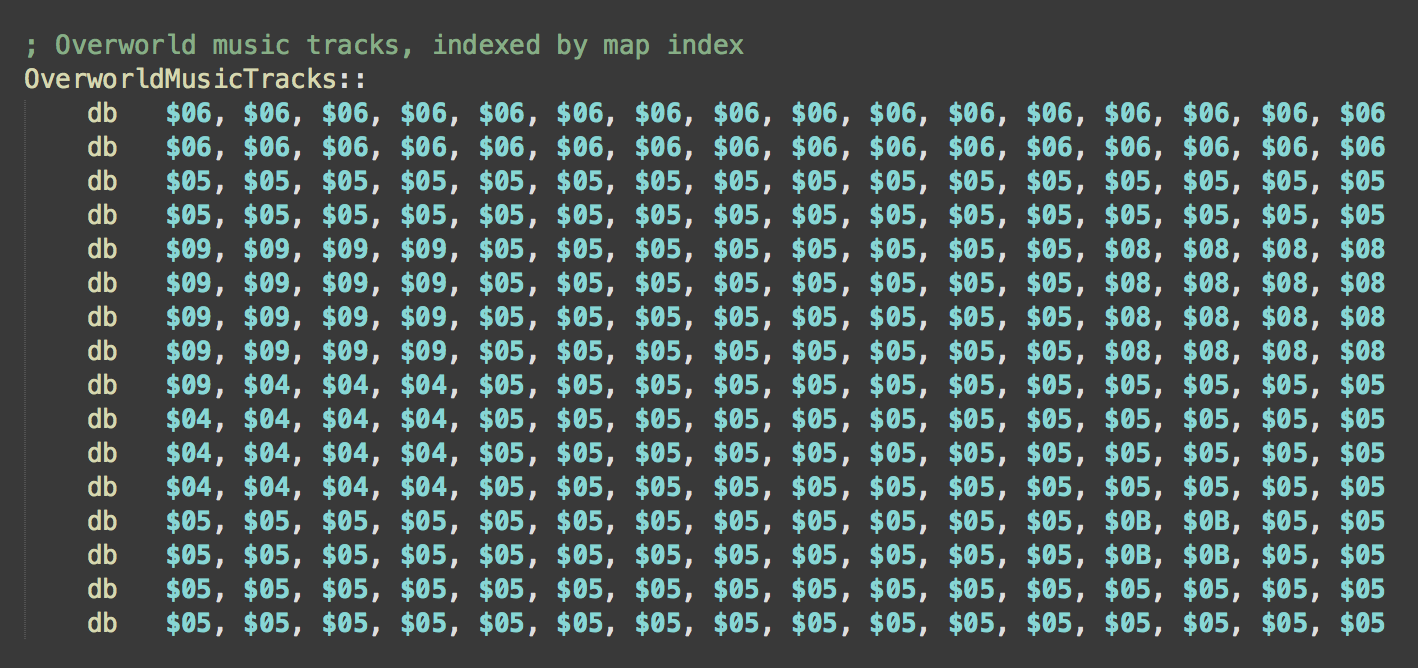
These values map the Overworld. Can you recognize the Mysterious Forest on the left ($04), and the Tal Tal Mountain Range ($06) on the top?
What’s next
Now that the disassembler can produce high-quality output, before reverse-engineering more code, I would like to add disassemblies for the other banks. The trick is to identify which sections are code and which are data–but at least for some of these banks it should be relatively easy to figure it out.
This week didn’t get as much work done as the previous week—but it sure has some progress.
rgbasm has special rules for deciding whether or not a label should be exported to the debug symbols. By default, only global labels (that are visibles by all code units) are exported into the .sym file.
This makes us face an annoying choice when labeling code. The best way to label intermediary routines would be to use scoped labels, which are prefixed with a dot, like .some_label. Scoped labels hey don’t leak into the global namespace, and there can be several of them with the same name (as long as they are not in the same scope). But in this case, these labels won’t get exported to the debug symbols, and won’t show up in our disassembling tools.
To work around this, we had to resort to an annoying fix: make most of the labels globals, like SomeLabel::. But then we loose the locality of the label, and all of them have to be unique in the whole source of the game.
Fortunately, the contributors who maintain the rgbds toolchain recently added an option to export all labels to the debug symbols, regardless of the label visibility. We can now have our cake and eat it: use local labels, and still having them visible in the debugger. Liberal use of local labels makes the disassembly much more readable, and I’m quite happy to have this technical restriction lifted.
Having all labels displayed in the debugger makes the disassembly much more readable.
The code for the File Save dialog is located right at the start of bank1. As this is code I often stumble upon when opening this file, I was keep to label at least the general structure of it.
As many other places in the code, it uses a jump table to control the transition between the Overworld and the File Save dialog.

For one year I’ve been writing the draft for an article that details the structure of the game’s main render loop. Unfortunately some bits and pieces of this section of the code are still obscure to me.
This week I tried to fill the gaps in areas I don’t understand yet. And a lot of progress has been made, especially on the transition special effets.
During the rendering, several types of special effects can affect the background, and give it a wavy feeling. Initially I though there were only three effects:
0x01: The dream shrine transition,0x02: The teleport departure effect when playing Manbo’s Mambo,0x03: The teleport arrival effect when being teleported to Manbo’s Pond.
But it turns out other transitions are using this code! They actually count in reverse around zero:
0xFE: The slow up-and-down motion when on the fisherman boat,0xFF: The wavy transition when the Wind Fish appears.
Unlike the first three transitions, these one are interactive: instead of the same frozen frame being displayed while the transition effect is playing, during interactive transitions the game continues rendering frames—which makes it possible to move Link while the special effect is applied, for instance.

Without this interactive effect, the Wind Fish apparition wouldn’t be as impressive.
What’s next
At some point I’d like to finally complete this article about the main render loop structure. There are still a few lines of mystery, but it’s almost there!
This week got quite some work done. The entire introduction sequence is now labeled, and the Awake disassembler starts to get quite useful.
This progress report has less graphics and screenshots than last week, as most of this week changes are done to the code. But let’s have a look anyway.
Export High-RAM variables to debug symbols
Last week, we saw how refactoring the disassembled code allowed the name of variables stored in WRAM to be exported to the debug symbols when compiling the game. This was useful for most game-related variables, which are stored in WRAM.
But there is another range of memory that was avoided until now: the High-RAM.
On the Game Boy, the High-RAM (or HRAM) spans from $FF80 to $FFFE. It is sometimes named “the zero page”, as it is the first range of addressable values.
What makes HRAM different? Well, accesses to HRAM are slightly faster than for the rest of the RAM. This is because of a shorter variant of the ld instruction: if only a single byte of addressing is provided, the load or store will be performed from the HRAM. As it saves a byte by not specifying the entire address, this variant is slightly faster. Also, the HRAM is the only memory that can be addressed during some specific operations—like a DMA transfer.
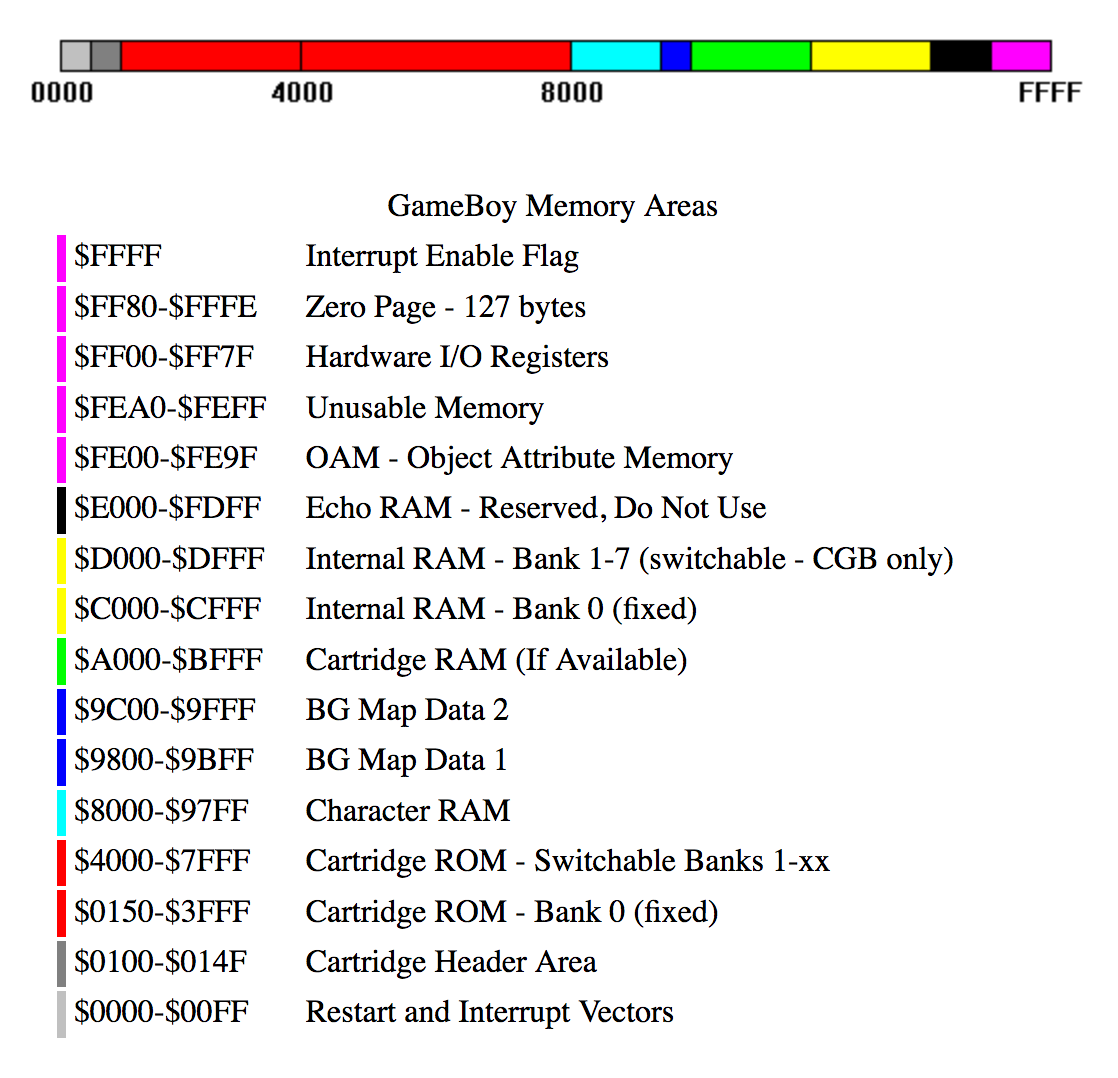 The HRAM (or “zero page”) is located at the end of the magenta section.
So great, we create a new section for the HRAM area, map the variables names (as we have done for WRAM), and we’re done, right?
Not so fast.
Let’s recap: if we want HRAM constants to be exported into the debug symbols, we need to turn them from constants into labels. For this, we need to define a custom section in the assembly code, to tell the linker where our symbols have to be exported in the final binary. And if we use a custom section, we hit a known limitation of the rgbds toolchain:
If you use this method of allocating HRAM, the assembler will NOT choose the short addressing mode in the LD instructions LD [$FF00+n8],A and LD A,[$FF00+n8] because the actual address calculation is done by the linker.
If you find this undesirable you can use the LDH [$FF00+n8],A and LDH A,[$FF00+n8] syntax instead. This forces the assembler to emit the correct instruction and the linker to check if the value is in the correct range.
(From the RGBDS documentation)
This means we have to convert every load instruction referencing HRAM variables from ld instructions to ldh instructions.
Fortunately this is easily done with a simple regular expression, which is what was done. And so with a bit more work, we finally get HRAM variables exported as well, and displayed in our disassembling tools.
Label the initialization sequence
When booting up the Game Boy, the internal firmware executes some hardware initialization—then hands over control to the game itself. And the first thing the game does is initializing itself.
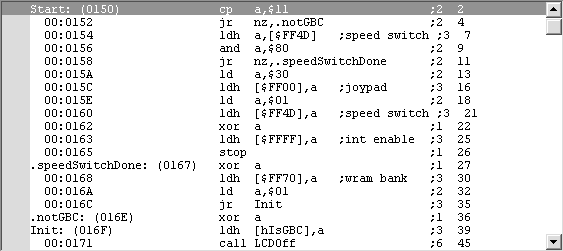
Although some of this process was documented, this week the whole initialization sequence has been entirely labeled.
This initialization sequence is rather short, and quite readable. It involves:
- Switching to double CPU-speed (when running on Game Boy Color) ;
- Turning off the LCD screen ;
- Clearing registers ;
- Initializing video memory to zero ;
- Copy the DMA-transfer routine to HRAM ;
- Initializing game variables to zero ;
- Turning on the LCD screen ;
- Initializing the save files ;
- Initializing the sound system ;
- Start rendering.
An interesting tidbit is hidden in the routine that initializes the save files. When compiling the ROM with debug tools enabled, it will write a pre-defined save file to the first slot. This save file has every item and quest status unlocked, all hearts, all seashells, and so on. Quite useful for testing features that appear later in the game.
When disassembling a binary, a good tooling is key. A good disassembly browser can make reading, following and understanding the code much easier. A good memory viewer will help to tell quickly whether a particular piece of data contains graphics, a map, or some music. A good debugger that can set fine-grained breakpoints will help understanding when the code attempts to access some specific memory location. And professional disassemblers are large and expensive software, because they can get so much done.
Since last week, some tooling improvements were merged. Notably, Awake can now import debug symbols generated when compiling the game.
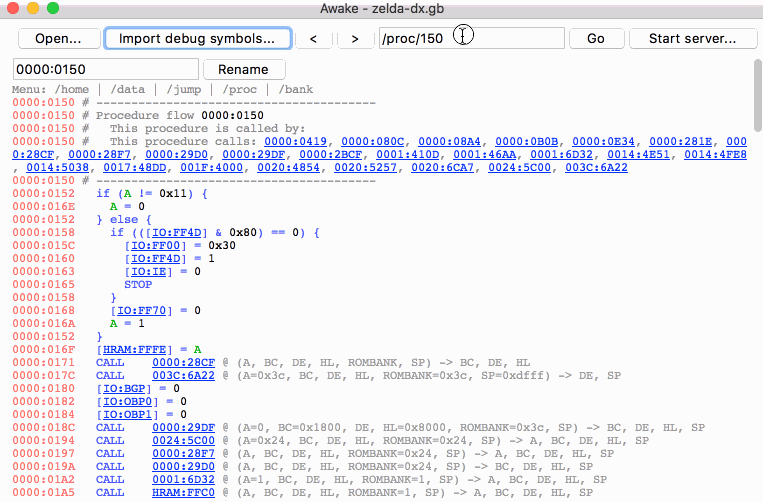 Importing debug symbols turns meaningless addresses into beautiful procedure names.
This paid off quickly, and made understanding the initialization sequence code much easier.
The following issues in Awake were also fixed:
I feel more confident with awake’s code base now, but there are still many parts that I don’t understand well. The hairiest piece of code seems to be the procedure flow analysis, which turns assembly code into C-style statements—and I’d like to understand it better, and start to improve it in some ways.
What’s next
For the next weeks I’d like to focus on the main render loop. It is already partially labeled, but many parts are still obscure to me. Hopefully the new tooling will make it easier to understand what is going on!