This week I found some time to work again of this Zelda: Link’s Awakening disassembly project. And it got quite a few improvements done!
Export all the graphics
The various graphics used in the game are stored in the ROM as binary files. Until recently, the binary sections containing the pictures weren’t even entirely identified.
This week, the remaining graphic banks were all mapped out, and all of them are now exported as PNG files. When compiling the game, the PNG files are converted back to their original 2bpp format, and inserted into the final binary.
For now, most of the pictures are exported as large sheets containing multiple graphical elements. For instance, this is a portion of the graphics sheet for the dungeons graphics.

Of course, it is possible to split these elements into individual items. But for now only a minority some background tiles and sprites are split up individually.


There is still work to do there.
You’ll also notice that most of the graphics are actually stored twice. Now remember that Zelda DX is actually a port on the Game Boy Color of the original “Zelda:Link’s Awakening”, which was initially released on the original monochrome Game Boy. However the remake could still run on the original Game Boy.
So it seems that during the development of the Game Boy Color remake, Nintendo’s developers duplicated all the graphics. This allowed them to tweak the graphics for the color edition—while leaving the original grayscale elements intact when running on a Game Boy or Game Boy Pocket.
You can see below some slight differences of graphics between the original graphics and colored ones.

N.B. All graphics, colored or not, are stored as grayscale images. Color is applied at runtime, using external palette data. This is what allows an identical piece of graphics to get various colors, depending on the context it is used.
Although the gameplay and story of the remake were the same than in the original game, some elements exclusive to the Game Boy Color were added. A notable one is the appearance of a photographer, which will sometime appear during the game to take a picture of Link’s adventures.
Good news: these pictures have been extracted too! However they are often compressed in some way. Space on a cartridge isn’t cheap, and was to be used with precaution. Also the photography scenes sometime contain moving parts and dynamic elements—which had to be encoded into the picture somehow.
This is why, although some of these pictures are recognizable, many of them look like garbled content, or a mixture of different items.
.")
Memory locations now show in the debugger
Disassembling the game is mostly about making sense of a bunch of machine code. And one of the most used technique is to reconstruct the labels and comments of the source code.
One good thing about labeling the different parts of the disassembled code is that they’ll get exported into debug symbols. These debug symbols can be read by emulators, debuggers, and other different tools to give meaning to the game code. The more we label, the more we can use these labels to progress further.
But until now, only function labels were exported into debug symbols. But how about the memory location labels, which indicate how are used some specific part of the memory, and are almost as important as function labels? Well, due to the way they were labeled in the disassembly, memory labels were not exported at all.
This week the declaration of the memory labels was rewritten, so that they get exported into the debug symbols. Which means for instance that memory locations now show up in the debugger! This will definitely make reverse-engineering easier in the future.


Awake decompiler
A few years ago, Github user @devdri started working on a tool to help the Game Boy games disassembling efforts : a custom Game Boy decompiler named awake.
The idea is to present the game code into a nice user interface, which allows browsing the code and jumping back and forth easily. It also features many heuristics to make sense of the assembly code: detecting the start and end of procedures, exposing jump tables, and displaying the assembly code as high-level C-style expressions.
Although this project hasn’t been active for the past few years, it seems it could be quite useful on its own. A few missing features would be a nice improvement to this tool though.
So this week I added support for labeling functions and memory locations from the UI. Support for importing debug symbols is also coming soon. Hopefully this will make awake a worthwhile tool for understanding the disassembled code.

Disassembling guides
It’s not easy to jump into a new project. How is the game even compiled? Do I need a custom toolchain? What are the tools used to explore the code and graphics?
Fortunately some guides are now included in the project README file. You’ll get a quick overview on how to use a debugger to label code, and how the scripts used to extract the graphics data work.
What’s next
For the next weeks I would like to:
- Use
awake to label some code, and see how it could be improved ;
- Start splitting up the main assembly file (
bank0.asm) into separate files ;
- Label more of the introduction sequence code ;
- Start using pokemon-reverse-engineering-tools instead of custom python scripts.
And we’ll see how it goes.
When powering-up the console, after displaying the iconic “Nintendo™” logo, many Game Boy titles jump you right to a title screen.
Zelda: Link’s Awakening does better, and open with a nice opening cutscene, which introduces the plot and the characters of the story. Several smaller animated sequences are also sprinkled through the game – and roughly half-a-dozen were added during the DX remake, as a part of the Photographer sub-quest. The Ending sequence, with its impressive 5-minutes length, also have some nice visual effects exclusive to this segment of the game.
This opening cutscene, as the first sequence of the game, is a good starting point for understanding various special effects used through the game.
The sea sequence, stripped
The original Game Boy was first released in 1989, and has quite basic capabilities. The graphic primitives are based on tiles, background and sprites. Tiles are 8x8 bitmaps, arranged into the grid of a large scrollable background.
This grid is very rigid: that’s 8x8 for you, and nothing else. Fortunately, sprites are objects that can move with smaller increments, positioned over the background.
Note that there is no “direct drawing” mode of some sort: you can’t draw individual pixels on the Game Boy screen, it has to be part of a 8x8 tile.
This severely limits the drawing possibilities. Any advanced effects will have to use complex workarounds.
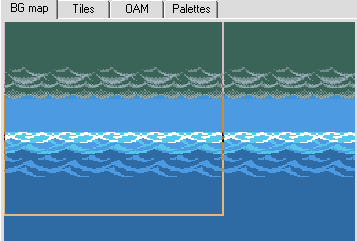
To understand, let’s have a look at the introduction sea sequence. We’re going to strip it of all special effects, and only use background scrolling, tiles and sprites.
(This can’t normally be seen in the game. But now that we have a limited source code, we can replace some code to disable specific features, re-assemble the ROM, and run it into our favorite emulator.)

Less dramatic, isn’t it?
However the reduced motion allows us to see more clearly what is going on. What have we here?
- Several set of tiles: for the clouds, upper waves and lower waves,
- The tiles are arranged over a repeating background,
- The background window is slowly scrolled from right to left,
- Link’s ship is rendered as a sprite, with two movements: horizontal (to simulate the ship being attached to the background) and vertical (to render the ship heave motion),
- Lightnings are also rendered as sprites,
- A dynamic palette, briefly changed when a lightning strikes to simulate the indirect light.
Now if we were the developers of Link’s Awakening, what could we add to this scene to spice it up?
Waves in motion
For now the sea looks very static, almost like a solid surface. Nothing remotely menacing, like a deadly sea ready to sink our ship. Breaking the waves into different overlapping parts would be much better.
Unfortunately the Game Boy doesn’t has much control over how the tiles are arranged over the background: a simple 8x8 grid, nothing else.
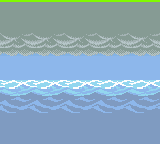
But luckily we can animate the content of the tiles themselves! And that’s what the developers used: they made a small looping animation of overlapping waves, like an animated GIF.

Here is how our scene looks with this wave animation.

Much better: we can see the waves going one behind each other.
However something looks strange. Due to the way the animation is made, the horizon is now moving up and down. Not very convincing. To avoid this, we’ll need a more complex trick.
Compensating for sea movement
Remember that we are drawing our scene over a scrollable background. The “camera” moving to the right is actually our background window being scrolled on the horizontal axis.
What we could do is also scroll the background up and down over the vertical axis, to compensate the horizon motion. This way the horizon position would appear constant. And this is actually what the game does.
Nice trick. But one issue remains: although the horizon position looks now fixed, the clouds now appear to be moving up and down.
If only we could move only the lower part of the background, and left the upper part untouched…
Wait, the Game Boy can actually do this – by using the LCD STAT interrupt.
Abusing HBlank
The Game Boy LCD screen renders graphics line by line, sequentially from the top to the bottom. When reaching the end of an horizontal line, the LCD controller makes a small pause (of more-or-less 300 cycles) before drawing the next line: this period between two lines is the Horizontal Blank, or HBlank. (The name comes from the old CRT screens, where the electron beam physically needed to move back from the right of the line to the left of the new line.)
Likewise, when the last line has been rendered, the LCD controller makes a longer pause before jumping again to the top line: this period is the Vertical Blank, or VBlank.
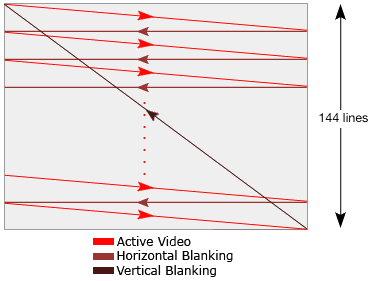
Manipulating the Video Memory while the screen is being drawn is quite restricted: during this period many operations on the video memory are not possible, or simply ignored. This is why the logic of most games runs during the VBlank period, when nothing is being rendered, and all the video memory can be manipulated freely.
To make it easier, the Game Boy hardware can fire an interrupt when the Vertical Blank period begins (appropriately named the VBLANK interrupt).
But the video memory can also be manipulated at the end of each line, during the HBlank period — although you have very few cycles to do so. One popular manipulation is to change the x coordinates of the background for each line: this allows to create a wave-effect seen in many games (like this one).
Firing an interrupt for every HBlank would be quite expensive though – especially considered that usually most lines will be left unmodified. Fortunately the Game Boy provides a smarter primitive for this: the LYC register.
LYC stands for LCD Y Compare: put the number of a scanline in this register, and the LCD Status interrupt (or LCD STAT) will fire whenever HBlank occurs on this line specifically. Almost like setting a breakpoint.
And this is what the game does here.
- Put the
$40 value in the LYC register (for scanline 64 in decimal),
- Enable the
LCD STAT interrupt,
- Wait for the next LCD Status interrupt to fire during the
HBlank period of scanline 64.
When the interrupt occurs, the execution pointer will jump to the address $0388, the hardcoded value for this interrupt. The code can then shift the position of the background position after the clouds have been drawn, but before the sea appears.

By moving in sync with the waves animation, this gives the illusion that the horizon is stable. Here is what the scene becomes with vertical motion compensated.

Note that the horizon motion is not perfectly compensated for: sometimes it moves one pixel up or down. I’m not sure if this is a bug or an intentional feature left there on purpose ; but it arguably looks better than having a perfectly stable horizon.
This is nice, but still lacks motion. To add some depth, an effect often see in 2D games is differential scrolling: scrolling portions of the background at different rates, to give an illusion of perspective and depth.
But remember, we still only have a static tiled background here. How can we add a differential scrolling effect on this constrained grid?
Well, we previously shifted the position of the background when the rendering reached a specific scanline: the same mechanism can be used again, but to shift the background horizontally.
This time we need to break at several different positions, one for each screen section. For this the game will divide the screen into five horizontal sections – and assign a scanline to each section.
Here is the relevant section of the game code that performs this effect.
data_037F:
    ; List of scanlines to divide the screen in horizontal sections.
    ; This is used to enable differential scrolling during the sea intro sequence.
    db $20, $30, $40, $60, $0  ; upper clouds, lower clouds, sea, upper waves, lower waves

; snip...

label_03D9:
    ; Setup the next HBlank interrupt for the Sea intro sequence.
    ; e = Section Index
    ld   hl, $037F     ; hl = $037F + SectionIndex
    add  hl, de        ;
    ld   a, [hl]       ; a = next section scanline
    ld   [rLYC], a     ; Fire LCD Y-compare interrupt when reaching
                       ;   the scanline for the next section.
    ld   a, e          ; a = SectionIndex
    inc  a             ; Increment section index
    cp   $05           ; If SectionIndex != 5
    jr   nz, .return   ;     return
    ; If SectionIndex == 5
    xor  a             ; Reset the section index to 0
What all this means? When the scanline for the next section is reached, the LCD STAT interrupts fire, and the background is moved. Then the game increments the section index, retrieves in a list the scanline for the next section, and reprogram the LYC register with the new value to break when reaching the next section.
The code for this is actually quite straightforward. I was so happy when I found out the meaning of these numbers stored at $037F! It’s actually a table, mapping the screen sections indices with a scanline.
Here is how the background is shifted and moved around when rendering a single frame of the Introduction sequence.
And here is how the differential scrolling looks in the game.

Random rain
The last thing missing is the heavy rain pouring over the ship.
These are just three different sprites (long, short, thick) arranged in several horizontal sections, following randomly-chosen predefined patterns.
By the way, the random number generator of the game is quite simple, but does its job well. It’s a function of the global frame counter, the previously generated random number, and the current LY register value (the number of the scanline being rendered at this time). Random enough.
label_280D:
    ; Return a random number in `a`
    push hl
    ld   a, [hFrameCounter]
    ld   hl, WR0_RandomSeed
    add  a, [hl]
    ld   hl, rLY
    add  a, [hl]
    rrca
    ld   [WR0_RandomSeed], a ; WR0_RandomSeed += FrameCounter + rrca(rLY)
    pop  hl
    ret
And finally, with the rain added, here is the Sea intro sequence at it looks like in the game!

All these effects are not unique to Link’s Awakening: they are of course found in many other games as well. But this game shows a remarkable combination of technical and artistic skills, associated to create a great atmosphere.
For more details, you can browse the annotated assembly code for the LCD Status Interrupt, or the code for the Introduction sequence gameplay.
Zelda: Link’s Awakening (1993) is fondly remembered by many players. Whether you played the original black-and-white version or the color remake, you probably remember an oniric story, the whimsical characters, an immersive soundtrack… This is also the game where appeared many iconic elements of the Zelda series: playable tunes on music instruments, compass and boss keys in dungeons, and so on.
When I played this game again recently, I was surprised by the amount of custom gameplay behaviors, one-shot sequences, and graphical effects. The game engine is simple and robust – but on top of it there is a ton of custom coding.
For instance, Link can walk around the map with pixel-per-pixel moves (unlike Pokemon, which moves block-by-block).

At some point, you get the Roc Feather, an item that opens a new mechanic: jumping over holes.

Or catching items mid-air.

And also, when waking over a hole, it will attract you, but give you a chance to stand back over firm ground.

Later in the game, you can also fly over multiple holes.
The physic engine also allows the player to swim, dive…

… or to switch from the standard top-down view to a sideway view — including during an epic boss-fight.

Some transitions attempt to simulate a 3D-effect (or at least some depth).

Characters will sometimes follow you. For instance, a ghost.

Or a dog, attached to you by a semi-translucent chain which moves realistically.

When powering-up the console, many Game Boy titles would jump you right to a title screen. Link’s Awakening does better, and open with a nice cinematic, packed with sprites and differential scrolling.

The game engine also has smooth screen transitions, like a fade-to-white between the interior or the exterior of a map…

… or even an eerie transition in the Dream House.

All these small touches to the physics engine and graphic visual effects seemed natural while playing the game – but it was actually quite amazing for a Game Boy game. Although not all of these effects present technical difficulties, the amount and the coordination of all this custom programming makes for a really immersive experience.
Disassembling Link’s Awakening
I was recently looking for a disassembly of Link’s Awakening source code, to see how some of the effects where implemented. And although Zelda: A Link to the Past on the Super NES has been mostly reverse-engineered, and Pokemon Red and Blue have been completely disassembled, there is no extensive disassembly of Link’s Awakening source code.
However an open-source project started poking into the game’s disassembly – and although it is still in early stage, it was a really good start.
So I started to look more into the source code, connecting a debugger to the game, setting breakpoints, and try to see how these things worked. Reverse-engineering assembly code is quite slow, but I’ll try to post some findings on this blog.


.")