This week got quite some work done. The entire introduction sequence is now labeled, and the Awake disassembler starts to get quite useful.
This progress report has less graphics and screenshots than last week, as most of this week changes are done to the code. But let’s have a look anyway.
Last week, we saw how refactoring the disassembled code allowed the name of variables stored in WRAM to be exported to the debug symbols when compiling the game. This was useful for most game-related variables, which are stored in WRAM.
But there is another range of memory that was avoided until now: the High-RAM.
On the Game Boy, the High-RAM (or HRAM) spans from $FF80 to $FFFE. It is sometimes named “the zero page”, as it is the first range of addressable values.
What makes HRAM different? Well, accesses to HRAM are slightly faster than for the rest of the RAM. This is because of a shorter variant of the ld instruction: if only a single byte of addressing is provided, the load or store will be performed from the HRAM. As it saves a byte by not specifying the entire address, this variant is slightly faster. Also, the HRAM is the only memory that can be addressed during some specific operations—like a DMA transfer.
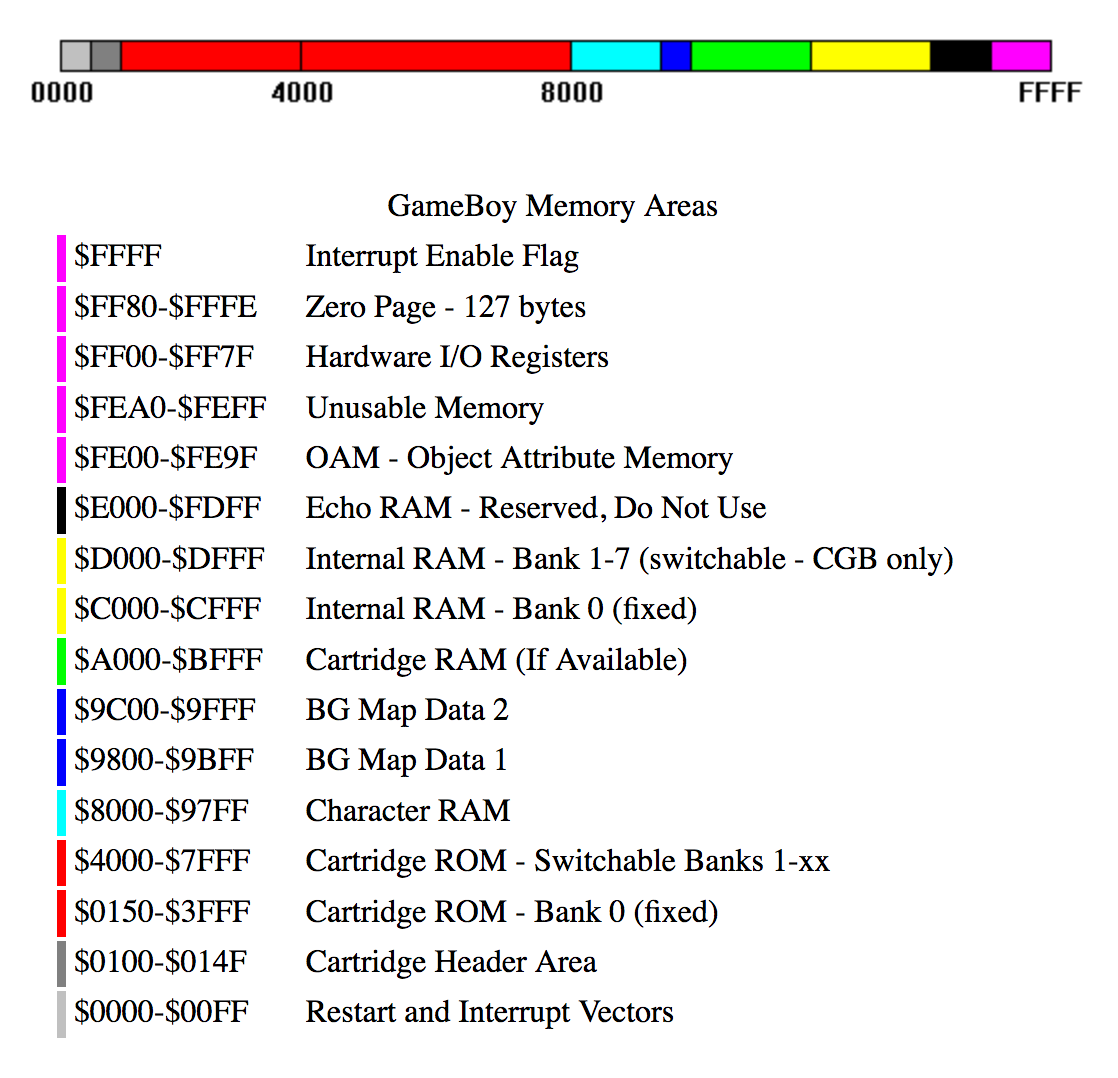 The HRAM (or “zero page”) is located at the end of the magenta section.
So great, we create a new section for the HRAM area, map the variables names (as we have done for WRAM), and we’re done, right?
Not so fast.
Let’s recap: if we want HRAM constants to be exported into the debug symbols, we need to turn them from constants into labels. For this, we need to define a custom section in the assembly code, to tell the linker where our symbols have to be exported in the final binary. And if we use a custom section, we hit a known limitation of the rgbds toolchain:
If you use this method of allocating HRAM, the assembler will NOT choose the short addressing mode in the
LDinstructionsLD [$FF00+n8],AandLD A,[$FF00+n8]because the actual address calculation is done by the linker.If you find this undesirable you can use the
LDH [$FF00+n8],AandLDH A,[$FF00+n8]syntax instead. This forces the assembler to emit the correct instruction and the linker to check if the value is in the correct range.
(From the RGBDS documentation)
This means we have to convert every load instruction referencing HRAM variables from ld instructions to ldh instructions.
Fortunately this is easily done with a simple regular expression, which is what was done. And so with a bit more work, we finally get HRAM variables exported as well, and displayed in our disassembling tools.
When booting up the Game Boy, the internal firmware executes some hardware initialization—then hands over control to the game itself. And the first thing the game does is initializing itself.
Although some of this process was documented, this week the whole initialization sequence has been entirely labeled.
This initialization sequence is rather short, and quite readable. It involves:
An interesting tidbit is hidden in the routine that initializes the save files. When compiling the ROM with debug tools enabled, it will write a pre-defined save file to the first slot. This save file has every item and quest status unlocked, all hearts, all seashells, and so on. Quite useful for testing features that appear later in the game.
When disassembling a binary, a good tooling is key. A good disassembly browser can make reading, following and understanding the code much easier. A good memory viewer will help to tell quickly whether a particular piece of data contains graphics, a map, or some music. A good debugger that can set fine-grained breakpoints will help understanding when the code attempts to access some specific memory location. And professional disassemblers are large and expensive software, because they can get so much done.
Since last week, some tooling improvements were merged. Notably, Awake can now import debug symbols generated when compiling the game.
 Importing debug symbols turns meaningless addresses into beautiful procedure names.
This paid off quickly, and made understanding the initialization sequence code much easier.
The following issues in Awake were also fixed:
*.gbc roms (instead of *.gb roms only) ;I feel more confident with awake’s code base now, but there are still many parts that I don’t understand well. The hairiest piece of code seems to be the procedure flow analysis, which turns assembly code into C-style statements—and I’d like to understand it better, and start to improve it in some ways.
For the next weeks I’d like to focus on the main render loop. It is already partially labeled, but many parts are still obscure to me. Hopefully the new tooling will make it easier to understand what is going on!