Neither the original Game Boy or the upgraded Game Boy Color had hardware support for partial translucency. This was always achieved with various hacks and workaround.
Let’s have a look at two of the most elaborated examples of these techniques, as showcased on the Title screen and End credits of Zelda Link’s Awakening.
On the title screen, after the main title appears, the “DX” logo appears with a nice, smooth fade.

But wait, the GBC doesn’t have variable opacity values. A sprite pixel can be fully transparent, or fully opaque – but there’s no “fade opacity from 0 to 1”.
So how is this gradual fading effect done?
The trick is that, instead of updating the opacity, the game updates the palette of the “DX” logo. Each frame, the “DX” palette is changed to go gradually from the sky shade to the logo shade. Nice.
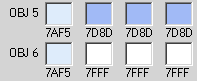
The palettes of the “DX” sprite during the fade-in
But wait! That shouldn’t work. The “DX” logo doesn’t sit over a flat-colored surface: it overlaps both the sky and the clouds. So how could changing the palette affect both the “sky → logo” and “clouds → logo” color progression?
Indeed, that’s an issue. And to solve it, the “DX” logo is split into two parts: one set of sprites for the part overlapping the sky, and one set for the part overlapping the clouds. Each part has its own palette, with its own gradual progression.

First set of sprites

Second set of sprites
Overall, a lot of effort for a small effect, that looks really easy to perform on modern hardware nowadays. But on the GBC, it actually required a good lot of tricks.
When beating the game without dying once, a portrait of Marin is displayed after the end credits.

We can see the same kind of transparency effects than on the Title screen:
That’s a lot to unpack here. Each of these effects is not easily doable using the GBC hardware.
The fade-in uses the same palette-update trick than the “DX” logo on the title screen: the sprite palettes are updated every few frames, and move from blue to the actual portrait colors.
However, notice that the portrait is quite colorful. Some 8x8 areas even display up to 6 different colors at the same time, like Marin’s medallion:

There are more colors on this single tile than the Game Boy Color usually allows.
A standard sprite can only display 4 colors on the GBC (that is, 3 actual colors + a transparent one). So how is it done?
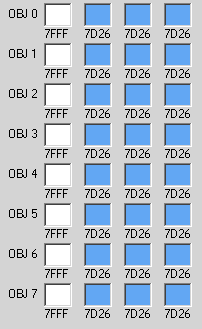
The answer is that the portrait is split into two layers of sprites, each with their own palette.

Layer 1

Layer 2
It is then composited to get the full portrait.

The two layers one on top of each other
This solves the “Many different colors” issue: different layers of 3-colors sprites are overlaid on top of each other.
(However, unlike the DX title logo, the difference of fading between the sky and the clouds is not accounted for. The overlapped cloud areas become blue at the beginning of the animation.)
Neither the GB or the GBC have half-transparent rendering – but they have the latency of the LCD screen. So the good old 50% transparency trick is used: displaying the portrait only every other frame.

The blinking effect, slowed down.
On full speed, the latency of the original screen then creates the half-transparency effect.
The seagull fades in gradually, on the middle of Marin’s face.
Same trick: this is done by gradually updating the palettes of the seagull sprite.
Again, Marin’s portrait palettes are gradually shifted to becoming blue again.
And that’s it. A neat composition of several tricks, for a good and moving ending.
So there it is: some of the tricks used to unlock partial translucency on the Game Boy Color hardware. Of course these techniques are quite time-consuming, and thus are only used during a handful of key moments.
A few years later, the hardware translucency support of the Game Boy Advance will make these kind of effects much easier to achieve.