These “weekly” reports are more like monthly now, and will probably be renamed at some point. But work continues! Let’s see what interesting happened in the past weeks.
Making the disassembly stand-alone
An ongoing effort is to make the disassembly standalone. For now, the disassembled files covers only around 80% of the ROM. The remaining blanks are filled at compile-time using the original ROM.
This is not optimal. It means that a copy of the original game is still needed to compile the disassembly. Also some parts of the code jumps to functions that are not referenced in the disassembly yet.
Making the disassembly standalone requires adding those missing and less figured out banks. And this is what is being done now, starting with the audio code.
Audio code and data
The audio in the game is split in several banks; each one covering a specific kind of audio effect:
- Full-length music tracks and jingles (using a combination of square-waves);
- Waveform-based sound effects;
- Noise-based sound effects.
The code and data for playing these audio effects was missing from the ROM–until now. This month, a basic disassembly was added for banks containing the audio code ; that is banks 0x1B, Ox1E and 0x1F. The code now lies in the src/code/audio/ directory.
This is a good progress towards understanding more of the audio formats. However the disassembly is still very rough: it has only very few labels and comments–and the music data format has not been figured out yet. This allows to fill blanks in the project for now; but much more work is waiting.
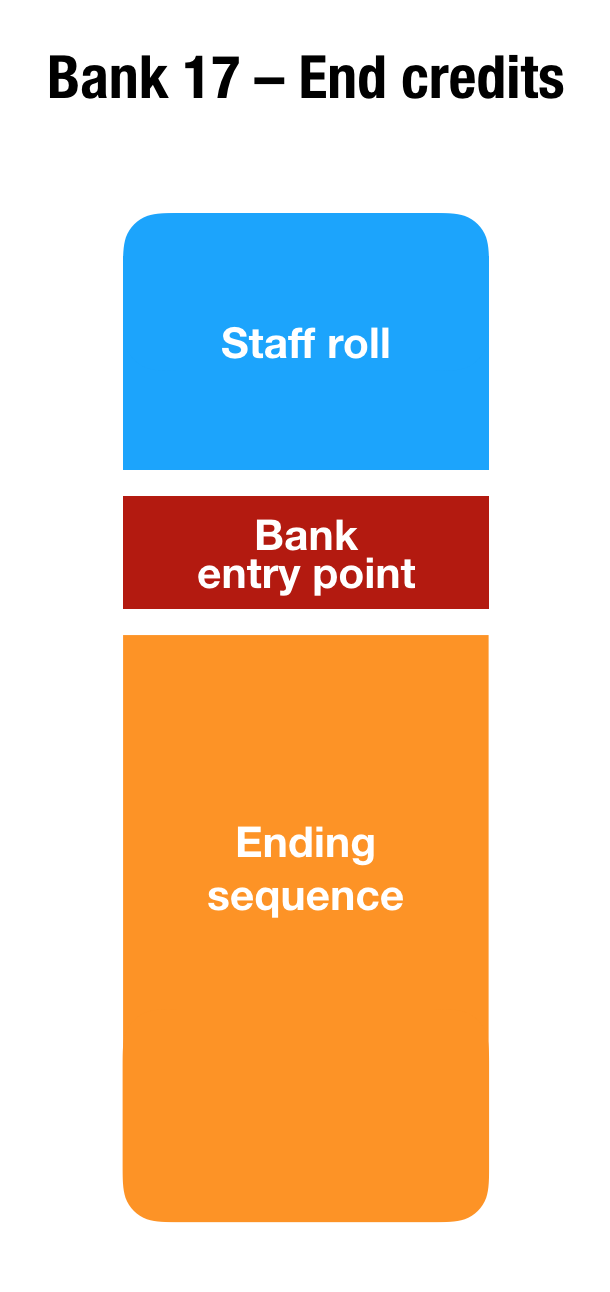
Credits
Continuing the “making the disassembly standalone” project, another bank was added this month: the code and data responsible for the ending sequence and credits. And there are a few tidbits of interest in it.
For instance, it seems that the staff roll code was written way before the other parts of the credits sequence. The staff roll code and data is laid out at the beginning of the bank–even the code that switches to the different parts of the ending sequence comes after.
This is unusual: most of the time the entry point of the bank is near the beginning of the bank, and the dispatch table for the different states comes quickly after.
Was the credits code written before the ending sequence was designed? Or is it a relic from “For the frogs the bell tolls”, the game whose code was used as the basis of Link’s Awakening engine?
Another interesting find is the way the staff names are displayed during the credits roll.

First, how is this nice transparency effect done? The Game Boy doesn’t have dedicated graphics functions to display full transparency, blending the foreground with the background.
So a hardware trick is used throughout the game: it relies on the LCD screen latency. When a game object needs to have some transparency (like shadows or ghosts), it is only displayed every other frame. As the individual pixels on the screen have some latency, the final color that the screen displays to the player is a mix between the foreground and the background color–thus providing the transparency effect.
But why was transparency used here? Although it showcases a visual effect uncommon and difficult to achieve on this console, it also makes the end result is not very readable.
The thing is, the developers had to.
Remember, the Game Boy has three ways to display graphics on screen: a tiled background, a window overlapping the background, and sprites. Here the tiled background is already used to display the clouds and the see. And the window is always opaque–it can’t be configured to show the background image underneath. So the letters need to be displayed using sprites. Sprites can have one color of transparency, and show the background underneath, so this is all fine.
Except for one thing. At most 10 sprites can be displayed on a single line. Due to a hardware limitation, aligning more than 10 sprites on the same horizontal line will result in a nasty uncontrollable flicker. And some names will clearly use more than 10 letters, and thus more than 10 sprites. The letters would flicker like crazy.
So what do developers usually did back then? A common technique is to avoid displaying all the sprites on a same line at once. For instance by, you guessed it, displaying some of the sprites only on even frames–and the others only on odd frames.
And this is exactly what Link’s Awakening developers did. The staff roll actually looks like this:

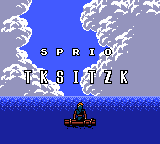
Clever? Yes.
Readable? Not so much.
Unavoidable? Definitely.
Contribution activity
Since last month there’s been a lot more discussions on the Discord server of the project. People much more knowledgeable than me about Zelda DX and disassembling things chimed in–coming from the pret discussion group, the Zelda speedrun community, and the Zelda 4 randomiser chat.
I’m really happy about having discussions with other people about this project, other disassembling efforts, and more. For instance, @featherless used an experimental tracing disassembler of them – to produce a relatively high-level disassembly of the ROM that automatically sorts out code from data.
Also this month, to give an easier time to newcomers, the README file has been streamlined, new wiki guides were written, and others were completed.
Automated checks
And, of course, say hello to our new continuous integration bot! This bot will tell you, for each PR, wether the code still compiles, and check that it still produces a 1:1 reproduction of the original ROM.
Setting up a compilation toolchain in the cloud wasn’t that easy (I’m looking at you, Docker). But it was worth it: since it was set up, the automated checks already caught a mistake of mine.
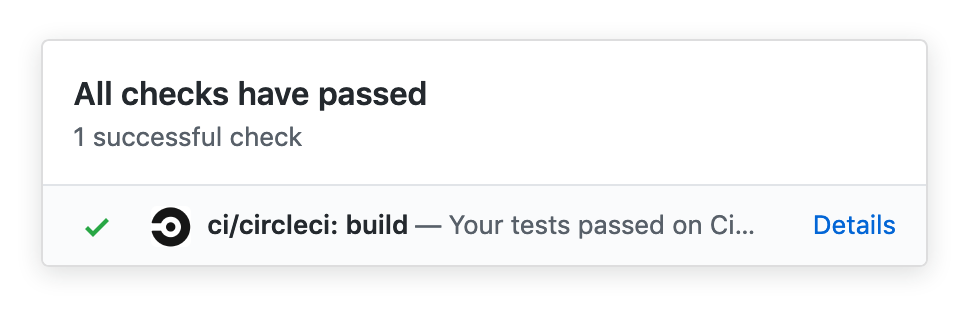
Isn’t that green checkmark lovely?
What’s next?
My short-term goal is still to make the disassembly stand-alone in a relatively short time.
But there is more to do. For instance, the entities data could be better parsed. And more exciting, all the entities IA code is just sitting here, waiting to be indexed. Ever wanted to know how was implemented the behavior of your favorite Zelda enemy? Now is the chance to figure it out.
It’s been a while! The last disassembly progress report was published more than one year ago. Meanwhile, what happened?
Well, kind of a slowdown, actually. But a few weeks ago, with the release of Link’s Awakening remake on the Switch drawing nearer, the disassembling efforts gained some steam again.
Which means many things appeared! Let’s see what’s new.
New repository
In 2015, on the 11th of August, mojobojo started a disassembly project. Four years later, this project has grown tremendously. With the participation of several external contributors, it made little sense to still have the repository under a single user account.
Thankfully, mojobojo agreed to transfer the admin rights to an organization. Which means the repository has a new home! It is now reachable at github.com/zladx/LADX-Disassembly.
The new organization makes also possible to add many admins and many contributors, which could make the contributions smoother.
More maps
Many of Link’s Awakening ROM hacks feature new maps. Throughout the years, many level editors came and went, trying to figure out how to read the game maps, and how to insert modified maps back without breaking the ROM.
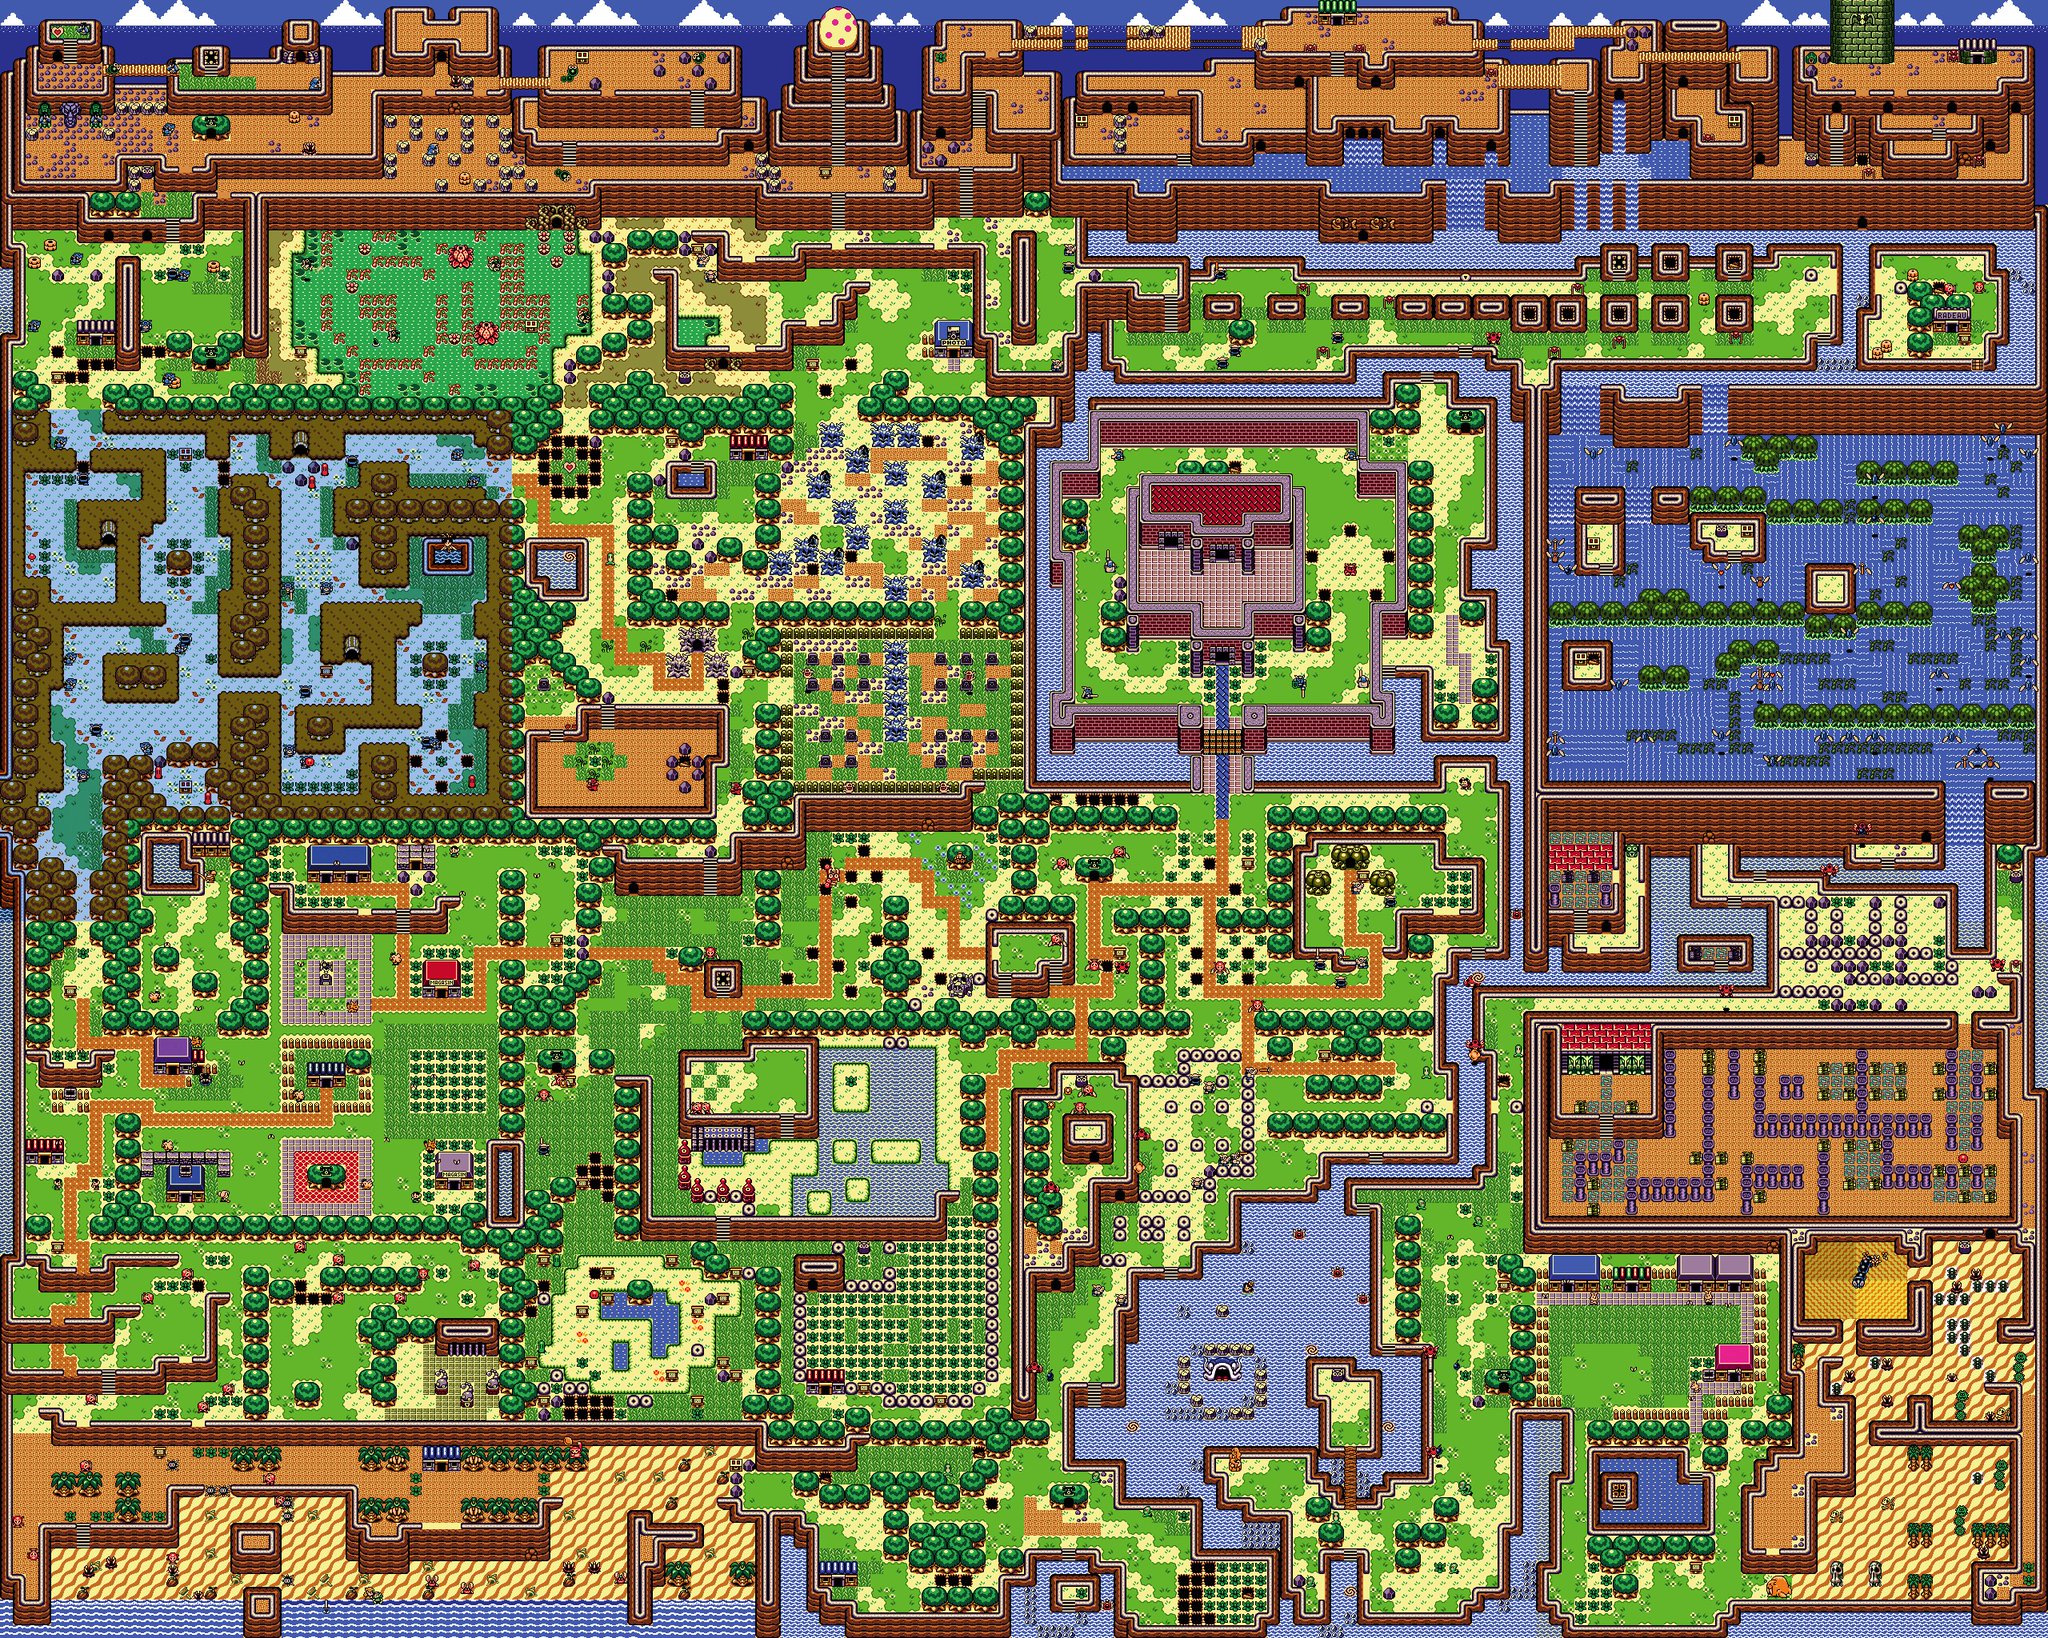 Isn’t that beautiful?
Unfortunately there is no central documentation about the map data format. Informations are scattered here and there, deep in the code of the level editors.
So with the help of Xkeeper0, a new parser for the maps, rooms, objects and warp points was written in Python. This parser emits nicely formatted files containing the rooms table and objects.
In the end, the format is easy enough:
- Maps are 16x16 arrays of pointers to rooms;
- Rooms are variable-length objects, containing:
- A two-bytes header describing the room tileset and floor template,
- A variable number of objects.
The neat thing is the objects format.
To save space on the original cartridge, rooms are not stored as a sequential array of all the rooms’ blocks (which would always use 10 × 8 bytes per room).
Instead, rooms are painted.
First, a configurable ground tile is repeated on the whole room.

Then, in dungeons, as the walls of most rooms look the same, a room template is applied.

And afterwards, objects are laid out individually on the room, in single-blocks – or in strips spanning several blocks.


In the end, here is how the final room looks like, after it has been entirely painted with objects.

The final size for this: only 30 bytes (instead of 80 bytes if all objects had to be stored individually). Neat. The game even defines a few macros which can paint directly a whole house or tree, for instance.
This also allows for nice animations of the rooms being constructed. You can even see the designers changing their minds mid-development, and overlapping bushes with flowers.
Credits: XKeeper0 Link’s Awakening Depot
More code
Last year, around 3 banks of code had been disassembled. Today, we are at 9 banks of code disassembled–and counting.
Disassembling new banks used to be difficult. The disassembler spew lot of invalid code, that had to be fixed by hand, and the existing variables and functions were not carried to the newly disassembled code.
This changed with the use of mattcurie’s mgbdis new disassembler, which emits very good quality code.
But disassembling a bank is useless if we don’t do anything with it. Once we have the raw code, it is only useful after cutting some noise: separate data from the actual code, and cross-referencing it with the existing banks. All of this takes time–so new banks are added progressively.
Recently, banks 14 and 20 were added. They contain some inventory code, the code responsible for applying room templates when loading a dungeon’s room, overworld audio tasks, palette effects…
… and something interesting: the code for enemies, NPC, dungeon bosses and entities behavior. Reverse-engineering the bosses IA will be fun.
More audio
The game uses the Game Boy audio capabilities for good effect: it may simultaneously play a long music track, a short jingle, and very short sound-effect.
I know you can hear the music in your head.
For a long time, the disassembly labelled two variables to control the sound effect:
; Play an audio effect immediately
hSFX::      ds 1 ; FFF3

; Play an audio effect next
hNextSFX::  ds 1 ; FFF4
Put the identifier of a sound effect in hSFX, and it will immediately. Put it in hNextSFX, and it will play after the current sound effect is finished.
Easy, right?
Well, while I was disassembling the code for the overworld audio tasks performed on each frame, I noticed the identifiers between these two variables didn’t match. For instance, writing $04 in hSFX would play a beeping SFX_LOW_HEARTS sound effect; but writing the same value in hSFX would play a “The doors of the room are now open” sound effect. Hmm.
I dug into the code to find where hNextSFX was eventually written into hSFX. I couldn’t find such code. Something was wrong.
Now, audio is not my speciality. So I turned to the Game Boy hardware documentation. Turns out that the Game Boy can generate a wide variety of audio (in stereo, for good mesure): it has two square-wave outputs, one waveform output, and one configurable noise generator.
Oh. Of course.
The reason two sound effects can sound different is that there are actually two kind of sound-effects: wave-based, and noise-based. It all comes to the hardware capabilities.
Everything makes much more sense:
- Jingles are square-wave-based sound effects. They sound like the music: a sequence of beeps;
- Wave sound effects are based on a wave-table. Although they are way larger to store, they can output a greater variety of sounds;
- Noise sound effects use the configurable noise generator to produce swings, swooshs, scratches and rumbles.
Now I could fix the code:
; Play a waveform-based audio effect immediately
hWaveSFX::   ds 1 ; FFF3

; Play a noise-based audio effect immediately
hNoiseSFX::  ds 1 ; FFF4
In hindsight this is quite obvious, and probably well-known by ROM hackers. But well, this was my epiphany. At least we now have a growing but already decent list of the different sound effects.
And now?
Two days ago, while trying to understand the entities data format, it occurred to me: this project is now closer to its completion than from its beginning. Maps, tiles and dialogs are dumped, most banks are disassembled, around half of the code is at least partially documented. And with all the data already labelled, the second half should be much easier.
Of course there are tons of things still to be done. Tilesets, warp data and chest data are missing. The room formats could be much improved. The enemy IA is in view, but still will require efforts. Audio has only been lightly touched.
But it has never been easier to make progress. Gone are the days of erring in a pile of assembly instructions, having no clue of what the code is doing: there is always a labelled variable to give a hint.
We’ve seen previously how Link’s Awakening renders the opening cutscene. This time, let’s take a step back, generalize, and have a look at the main render loop.
The game’s core
Games are usually based on a main loop. Conceptually, it looks like this:
while (true) { // loop forever
  processInput();
  updateGameState();
  renderFrame();
  waitForNextFrame();
}
In plain text, the main loop repeats the same operations, once per frame, over and over:
- Read the joypad values (i.e. which buttons are pressed),
- Update the game state according to the new time and input (for instance move the character to the right).
- Write the required graphics into the video memory,
- Wait for the graphic hardware to process the current frame,
- Once the frame has been displayed, loop and start computing the next frame.
Of course this is a simplification, and a few key elements have been omitted (for instance there is no audio there). For more information, you can read this much more extensive article about the render loops generic structure.
Link’s Awakening makes no exception, and has its own render loop, right after the initialization code. Let’s see how it is handled.
Read more…