The Game Boy, as most gaming platforms at the time, uses tiles for graphics rendering. Instead of drawing individual pixels on the screens, games must first provide tiles (small graphics fragments, usually 8x8 pixels wide), and then combine together this limited number of tiles to draw pictures on the screen.
This technical limitation influences not only the games appearance, but also the gameplay. This articles goes in-depth into a specific example: how the design of Zelda: Link’s Awakening overworld map is influenced by the underlying tile-based rendering.
Challenges of tiles-based rendering
To display an image on screen, as all tile-based games, the game engine must first copy the required tiles to the Game Boy VRAM.
This brings two challenges:
The number of tiles that can fit into VRAM at a given time is extremely limited,
Changing the tiles stored in VRAM is slow, and can only be done at specific times.
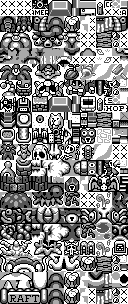
A part of the tileset used on the Overworld.
This is way to big to fit all in memory at once, so only parts of it can be loaded at a time.
So in order to display graphics efficiently, great care must be given to the resource-management of tiles.
A modern game engine would probably include a resource-management system, which would ensure that, for each frame, the tiles required to display the objects on the screen are properly loaded. But the code for such a system would be quite complex: as uploading tiles takes a lot of time, it would have to predict which objects are going to appear on screen. The system would also have to ensure that not too many different objects are going to be visible on screen at once–otherwise there’s no space left in VRAM to upload the required tiles.
But on older hardware, such as the Game Boy, VRAM is so limited that every single tile must be put to use. There’s no margin left for predictive loading or fancy resource-management systems.
Instead, older games generally use tilesets. Tilesets are some fixed sets of tiles that are grouped together, and known to be predictable available at a given time. The game designers typically give each scene its own tileset, and then use a tile editor to draw the rendered frame. And the tilesets can be switched when the game transitions from one scene to another.
As of Link’s Awakening, the code responsible for this resource management has recently been documented. And this is exactly how the game manages tiles. The world map is divided into sections of 2x2 rooms. Each section has an associated tileset, which allows the map feature some variety between the different sections (because they can use different tilesets).
An array is not very telling. Let’s use a picture instead! And we’re lucky, because a few years ago, Xkeeper generated a map of the Overworld with the tileset IDs overlaid on each section.
Each 2x2 section of the Overworld map declares its own tileset ID. (Credits: Xkeeper)
Quite simple – in theory.
Technical constraints
Practically, it’s not so easy. As we know, in Link’s Awakening, when player moves from one room to another, the game animates the changes smoothly. Which means that during the transition, both the previous room and the next one are visible.
So during a room transition, both the old and new tileset need to be available in VRAM. Otherwise, glitches will ensue: if the tileset of the new room overlaps the tiles of the previous room, the previous room will shortly be rendered with incorrect tiles. Every time the game designers want to introduce new tiles, they have to think about the transitions from all the adjacent rooms. Moreover, this is hard to debug: the glitches could manifest only when visiting the rooms in a specific order.
Link’s Awakening engine has a solution for this: put structural constraints on the map design to avoid the issue almost entirely. Instead of testing every combination of rooms and tilesets, the game instead:
Defines a special “Keep current” tileset code,
Ensures that the player always goes through a “Keep current” tileset before loading a new one.
The “Keep current” tileset code is a special tileset ID, that instructs the game engine not to load any new tileset data for the current section of 2x2 rooms. You can spot it on the tilsets map above: it has a 0x0F ID.
How does it solves our tileset issues? Well, a “Keep current” tileset is kind of a buffer zone between two different tilesets. A section with this tileset must be displayable using any of the tilesets of the section leading to it.
In this layout, depending on the player direction, the Section 2 tileset may be displayed either with Tileset A, or with Tileset B.
Which means that by design, a “Keep current” section can only use the tiles shared by the adjacent tilesets, in that case the Tilesets A and B. If this rule is not honored, the graphics of the “Keep current” section will be corrupted.
So by introducing some design constraints, the game avoids to ensure that every tileset has to be compatible with any tileset that could be adjacent to it. Now the game designers just have to ensure that some sections only use a restricted number of tiles shared between the adjacent tilesets. These “Keep current” sections will feature less unique details, but will ensure that transitions between different tilesets are always glitch-free.
Revealing the hidden structure of the Overworld map
The only thing that remains is to ensure that the player can never navigate directly from a tileset to another – but instead always goes through a “Keep current” area first.
Lo and behold, this reveals the hidden structure of Link’s Awakening Overworld map.
Here’s the same Overworld map than above, with the tilesets overlaid – but this time, the “Keep current” tilesets are highlighted in green.
Overworld map of Link’s Awakening. In green: the “Keep current tilesets. In red: walls and natural obstacles on the map.
As you can see, the game designers had to put restrictions to ensure that the player can never directly transition from a tileset to another – but instead goes through a “Keep current” tileset first.
How? By putting walls and obstacles on the map that separate the tilesets. These are the one highlighted in red on this map; the player can never go through them. The obstacles constraint the player’s path, and ensure the tilesets continuity.1
Impact on game design
Like all technical restrictions, limitations on tilesets are also a source of creativity.
Because of the “Keep current” buffer tilesets, it’s easier not to connect every section of the map to every other: obstacles must be built. But this constraint has upsides: it gives the map a labyrinthine structure. And that’s helpful for a good game design: it tends to divide the map into distinctly themed sections. Folds also make the world feel larger, like does a curated garden with carefully placed occluders.
The need to interleave buffer tilesets on the map also gives natural pacing to the game. Buffer tilesets can’t have the same visual complexity than other sections of the map (because they can only use a limited number of tiles). It makes simpler areas alternate with higher-complexity ones. As a result, the player will usually travel through a strongly-themed section, then a more generic one (as they move through a buffer tileset), then again reach another themed section. This sense of rhythm is a key element of a good game design.
Notes
Of course there are several exceptions to this:
The Photographer Shop section (using tileset 0x1A), is actually a “Keep current” tileset. But when the Photographer was added in the DX version, the tileset was special-cased to load the shop tiles when entering this room. On other rooms, it behaves like a true “Keep current” tileset.
On the Windfish Egg section, tileset 0x3C can communicate directly with the tileset 0x3E on the East. For this, the room on the right of the Windfish Egg is special-cased to swap the tilesets smoothly.
Around Kanalet Castle, some other sections do change tileset without going through a “Keep current” tileset. In that case, we’re back to manual tiles management: the connecting rooms are carefully engineered to use the overlapping parts of the two tilesets.
So the constraint of buffer sections allows to greatly simplify tilesets management – but is still flexible enough to allow exceptions, or even revert to manual tiles management wherever needed. ↩
First let’s congrats the following new contributors, who made their first commit to the project during the past months:
@Xkeeper0 did, in their own words, “Misc improvements across everything”. This included a ton of things, including documenting debug tools and unused code, and a more readable way to format minimap data using clever macros.
@daid reverse-engineered the compression format used by background maps, and documented many memory locations.
@PileOfJunkMail documented the signposts of the Prairie maze, Eagle’s Tower wrecking ball, and replaced a lot of hardcoded numbers with constants.
@Vextrove, among other things, identified all the music tracks from the game, and added many constants to show their use throughout the code.
🔀 Source-code shiftability
Efforts to make the disassembled source code shiftable have been ongoing for half a year now. And this time, there’s a great news:
Zelda: Link’s Awakening source code is now shiftable! 🥳
What does that mean? Let’s borrow an analogy from Revo, of the sm64decomp project:
You have a piece of graph paper on a table, except there’s a problem: nails are nailed through certain coordinates to the table. Try to move the paper and it tears it up.
Shiftability means pulling each nail and writing down the coordinate it was pointing to.
Binary modders are just really good at working with the nailed paper, regardless of the nails, by cutting and pasting available pieces and drawing on the empty spaces and stitching stuff (and in some cases just tapes on an extra piece of paper which is used as a dumping ground).
Getting the source code shiftable means that we reached the point where all nails are removed. Which means it is now much easier to add new code, or change what the current code is doing–without breaking the game. For instance, it could make it easier to create a level editor, a full-conversion mod, a gender-swapped version of the game, or a randomizer.
Building tools to help pointers resolution
This was a months-long effort, that required scanning 150,000 lines of code for hardcoded pointers. To help this effort, some of it was automated.
ℹ️ This section dives deeper into the technical details of pointers resolution. If you prefer a higher-level view, jump directly to the next section.
Most pointers can’t be reliably identified using purely automated ways: a series of bytes like db $01, $4E, $87, $4F could be the definition of two pointers ($4E01 and $4F87), but might as well be a display list, or any data block.
However, load instructions (such as ld hl, $65E2) almost always refer to a data pointer in the current bank. This is not 100% foolproof: sometimes the loading instruction may be data that was wrongly interpreted as code, or it may be loading a pointer to be used later in another bank. But mostly, this is a good guess.
Using these guesses, a script scanning the source code for these loading instructions was written. Using the current state of the source code, and the symbols already identified, the script can output a list of missing data pointers for the current bank – including the length of the data block.
The way the script work is:
Read all the symbols already generated;
Read the given source file (e.g. bank_1F.asm);
Find all the ASM loading instructions in the source file that refer to a raw pointer (e.g. ld hl, $65E2);
Convert the raw pointers to data symbols in the current bank (e.g. $652E → Data_01F_652E);
Guess the size of the data blocks, by assuming the blocks runs up to the next symbol defined in the bank;
Emit a new set of debug symbols, augmented with the newly extracted pointers;
Run the disassembler again, feeding it the augmented symbols.
Once the disassembler is run again, it produces an updated version of the source file–but with the data blocks properly labeled, and with those labels correctly referenced the loading instructions.
This new source file must then be manually merged with the original source file, by cherry-picking the data-label changes, while keeping the annotated comments from the original files.
In the end, this script helped to resolve around 50% of the raw data pointers. The rest of it (jump tables, pointers tables, etc.) had to be labeled manually.
Ensuring shiftability
If some hardcoded pointers remain in a code bank, adding or removing code from those banks won’t shift those pointers. This could result in subtle bugs in the compiled game.
To ensure that a given code bank is shiftable, a simple check is to insert some nop instructions at the beginning of the bank (thus shifting the entire code by some amount), and play the game to see if anything breaks.
This method is simple–but running all code paths to ensure that everything works smoothly is difficult and time-consuming. Moreover, once a bug is found, it can be tedious to identify the precise location of the faulty pointer.
@marijnvdwerf found a better way: he used other versions of the game. Three main different versions of Link’s Awakening DX were released: v1.0, v1.1 and v1.2 (and this doesn’t count smaller changes localized versions in English, French and German). While attempting to add support for other versions, Marijn found many small non-matching data blocks. Indeed, these data blocks contained raw pointers, that weren’t properly shifted when compiling another version of the game.
Luckily, unmatched data blocks are easy to pinpoint–for instance using an hex diffing tool. The pointers still had to be fixed manually, but at least they were precisely identified.
Caveats
Although the code is shiftable, some of the graphics data may not be moved around freely: it requires splitting large graphics sheets into several smaller pieces, which is not entirely done yet.
But shiftability is definitely a huge milestone, and should make the life of moders easier.
🎵 Music disassembling
Around March, @Drenn1 started to have a look at the format of music tracks. Rather than documenting the code, he was attempting to understand the meaning of the music data.1
This led him to write an impressive Python script, that can read the music track binary data, and dump them in a human-readable form.
Long-story short, a music track is defined by:
A default transposition factor (usually 0);
A default speed;
Up to 4 channels tracks.
The 4 channels tracks are controlling the 4 hardware audio channels of the Game Boy: two square wave (that produces MIDI-like music), one programmable waveform (for playing custom sounds), and one programmable noise generator (for playing noise-based SFX).
And each channel track is actually a program. Channels tracks are a sequence of opcodes, that can either:
Play a note,
Pause,
Change the sound volume,
Change the speed,
Loop for a number of times.
For instance, let’s have a look at this channel track:
This channel track will produce the first 4 seconds of the main channel of the Title Screen theme, which you can hear below:
Link’s Awakening – Title Screen
Some opcodes are still not fully understood. Nonetheless, this is an incredible work, that allow us to both understand how the sound engine works, and how it can be modded to add new music tracks.
Transposition and trivia
Interestingly, only a handful of music tracks actually use a non-zero “default transpose factor”:
MUSIC_HOUSE, played inside the regular inhabitants houses (transposed by 4);
MUSIC_RICHARD_MANSION, played inside Prince Richard’s house (transposed by 4);
MUSIC_CUCCO_HOUSE, played in the Hen House (transposed by 14, one octave);
MUSIC_MINIBOSS, played during mini-boss battles (transposed by 2).
Except for the mini-boss, it seems that at some point during development the game designers decided to make musics playing in several houses higher-pitched. We can only guess why; but maybe that was to give a slightly more upbeat tone.
You can listen to the differences in MUSIC_HOUSE below:
HOUSE_MUSIC – Final pitch as in the released game.
HOUSE_MUSIC – Originally programmed pitch.
📦 Pre-composed save game
Did you know that Link’s Awakening includes a pre-composed saved game, that gives you right from the start all inventory items, dungeons keys, special items, and so on?
It was included as a developers feature, and disabled in the released game. But with a bit of tweaking, it’s easy to re-enable it. As Xkeeper and the fine people of The Cutting Room Floor documented more than ten years ago, enabling the Debug tools of the game will automatically write this pre-composed saved game to the first slot.
So Xkeeper dug into the code, and found how this feature works: under some conditions, a segment of data is simply copied to the save slot.
Before they documented this block of data, it looked like this:
And after their work, and some bits of clever ASCII-art, the data for the pre-composed saved game now look like this:
DebugSaveFileData::dbINVENTORY_SHIELD; B buttondbINVENTORY_SWORD; A buttondbINVENTORY_BOMBS; Inventory slotsdbINVENTORY_POWER_BRACELET; .dbINVENTORY_BOW; .dbINVENTORY_HOOKSHOT; .dbINVENTORY_MAGIC_ROD; .dbINVENTORY_PEGASUS_BOOTS; .dbINVENTORY_OCARINA; .dbINVENTORY_ROCS_FEATHER; .dbINVENTORY_SHOVEL; .dbINVENTORY_MAGIC_POWDER; .db1; Have Flippersdb1; Have Medicinedb1; Trading item = Yoshi dolldb0; 0 Secret Seashellsdb0; (@TODO "Medicine count: found?")db1; Have Tail Keydb1; Have Angler Keydb1; Have Face Keydb1; Have Bird Keydb0; 0 Golden Leaves / no Slime Key; Dungeon flags ...; +-------------- Map; | +----------- Compass; | | +-------- Owl Beak / Stone Tablet; | | | +----- Nightmare Key; | | | | +-- Small keys; | | | | |db1,1,1,1,1; Tail Cavedb1,1,1,1,2; Bottle Grottodb1,1,1,1,3; Key Caverndb1,1,1,1,4; Angler's Tunneldb1,1,1,1,5; Catfish's Mawdb1,1,1,1,6; Face Shrinedb1,1,1,1,7; Eagle's Towerdb1,1,1,1,8; Turtle Rockdb1,1,1,1,9; POI: unused? (9th dungeon?)
Way easier to understand.
As you can see, two details are a little curious:
An unused byte displays a counter near the Medicine item. It seems that at some point during the game development, the Medicine was intended to be a regular collectible item, and that the player could stash several of them in the inventory. This feature was cut from the released version of the game.
Dungeons items are given for the 8 regular dungeons, but also for a mysterious 9th dungeon. It seems the game treats this dungeon as the Windfish Egg, but never actually uses these values. Maybe the Windfish Egg was intended to be a fully-featured 9th dungeon?
🗺 Minimaps format
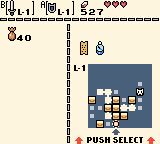
Although the Overworld map is accessible all the time by pressing the SELECT button, dungeon minimaps are displayed in the inventory.
The minimap of Tail Cave, the first dungeon.
To display those minimaps, the game stores one array of bytes per map. The 0xEF value stands for a simple room, 0xED for a room with a chest, and 0xEE for the dungeon Nightmare room.
In the disassembled code source, these maps were previously formatted as a simple array of values:
Xkeeper found a clever way to make this data more readable: using rgbasm charmaps.
In the source code, a CHARMAP command tells the assembler how to convert ASCII characters to sequences of bytes. This allow for instance to map the text of dialogs to the indices of the tile to use for each letter. Xkeeper found these charmaps another use: by defining a custom charmap, it becomes possible to format the dungeon minimap data as text and symbols.
NEWCHARMAPMinimapCharmapCHARMAP" ",$7D; Blank (not shown on map)CHARMAP"##",$EF; Room (shows up on map)CHARMAP"Ch",$ED; Room with chestCHARMAP"Nm",$EE; Nightmare boss marker
At compile-time, the charmap gets the text converted to the expected bytes. Which means that the dungeon minimap data now looks like this:
Plus we can now clearly see the map of the first dungeon (Tail Cave) being shaped like a Mini-Moldorm, and the second dungeon (Bottle Grotto) being shaped like the jar of the boss.
What’s next?
With source code shiftability achieved, the next point of focus is graphics data. For now the graphics of the game are not so easy to edit: many of them are laid out in a complicated way, using baroque color palettes. Some issues have been opened: hopefully we’ll find a way to convert all graphics to easily editable sprite sheets, that can be transposed to the format expected by the engine at compile time.
Marijn is also close to merge an impressive PR that allows to build every single revision and language of the game.
And of course, the documentation of the physics engine and entities behavior is still an ongoing work.
Notes
You may already know Drenn, because years ago he gave a new start to this project. He dived into all the numerous errors that had crept in the then-partial disassembled source code, and fixed them all. Moreover, he added a checksum step, to ensure the code would never diverge from the compiled game again.
In a previous progress report, I wondered how Link’s Awakening respawn mechanism works.
Specifically, when destroying enemy entities on a specific area, moving out and back into this area doesn’t reload all the entities. Only the surviving enemies (if any) are visible. For a moment, at least. After a while, the enemies seems to respawn again.
Entities don’t respawn when returning to a previously visited area.
Eventually I found the piece of code responsible for this behavior. Turns out the implementation is cleverly simple.
It relies on two separate mechanisms: a recents rooms list, and flags depending on the entity load order.
Clearing rooms
The first mechanism used is a 16x16 array, wEntitiesClearedRooms. It contains one byte per area (or “room”). When all the enemy entities in a room are destroyed, this is recorded into this array.
When this room is visited later again, the game checks whether the room has been cleared or not before loading the entities. Simple enough.
But how do entities respawn again after a while? Well, because the wEntitiesClearedRooms also has companion variable: wRecentRooms.
wRecentRooms stores the six most recently visited rooms. At its core, it’s a simplified implementation of an LRU cache:
Each time a room is visited, it is added to the recents rooms list (except when the room is already in the list);
When the list reaches six rooms, the index resets to the start of the list.
Clean and tight. But importantly, this means that new rooms will start overwriting older ones.
How does this relate to entities respawning again? Well, the single and unique purpose of wRecentRooms is actually not to store a list of recently visited rooms, but to detect when a room is evicted from this list. When a recent room is overwritten by a newer one, the byte corresponding to the evicted room in wEntitiesClearedRooms is reset to zero. Which means the entities of this room will start spawning again when the room is visited.
Entity flag
The game has actually a finer granularity than that. It’s not about whether then entire room is cleared or not: even destroying a single entity in a room will cause it not to respawn the next time (even if other entities in the room still do spawn). How does that work?
Only destroyed entities don’t respawn. The others are still loaded when visiting the room again.
Turns out that the wEntitiesClearedRooms array doesn’t only tell if a room has been cleared or not, but also which entities have been destroyed in that room.
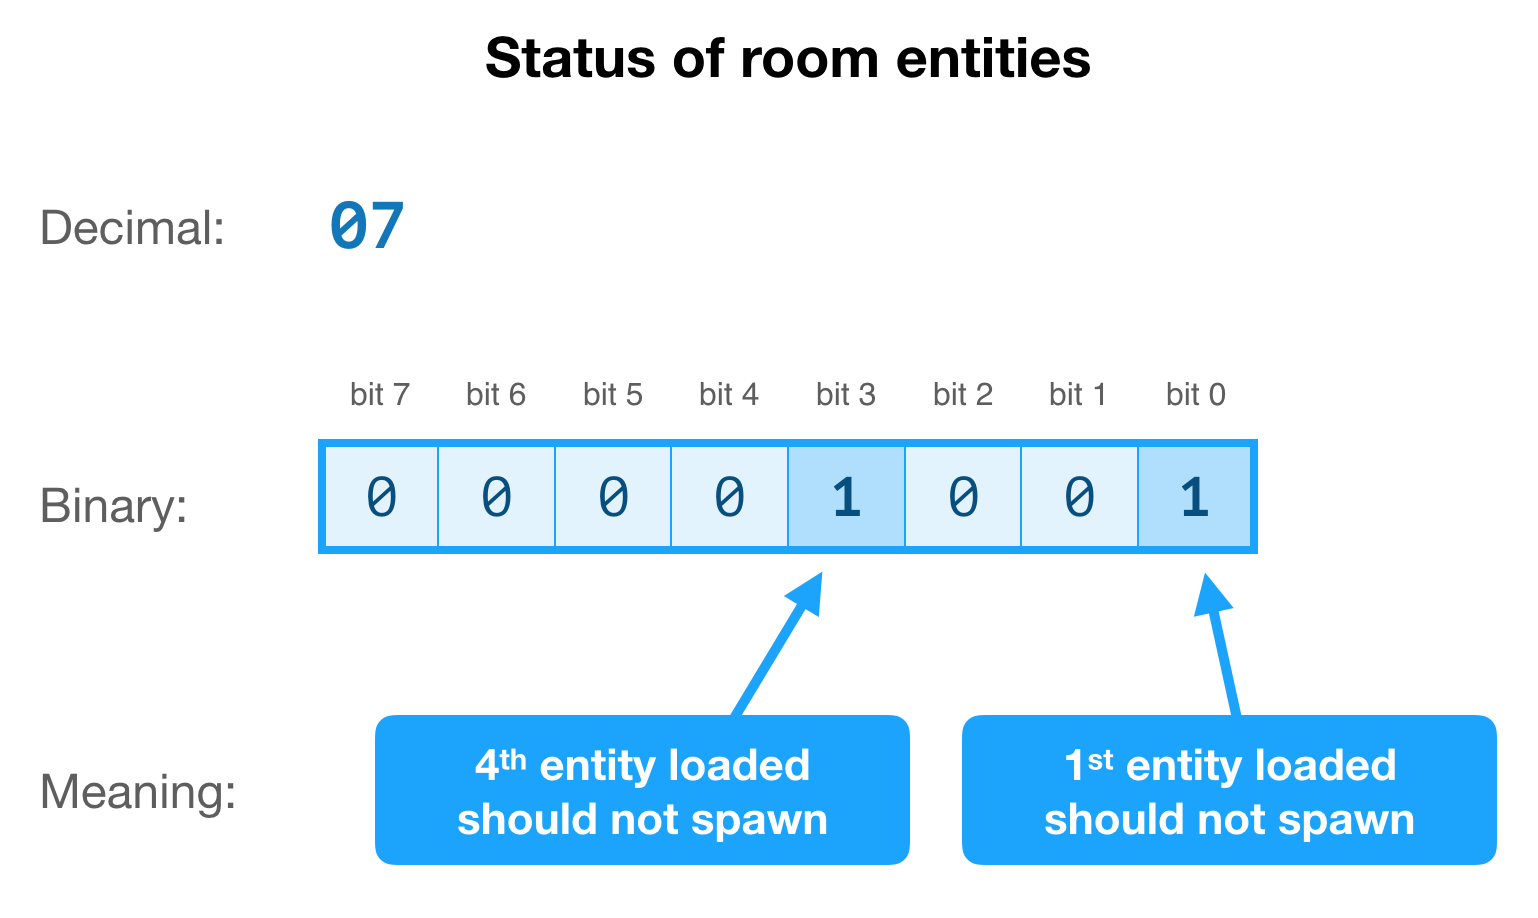
For this, entities are identified by their load order. Each entity has an index indicating in which order it was loaded into the room. So when an entity is destroyed, the game takes the entity load order, turns it into a bitmask, and stores it into wEntitiesClearedRooms.
Next time this room will be visited, when each entity is loaded, the game uses the load order to check if the entity has already been destroyed – and skip it if so.
Statistics
Knowing where we are and how much progress we made is instructing and motivating. For this purpose, similar to some of the pret projects, the LADX disassembly now has a script that can output various statistics about the overall completion state of the project.
Here is an example output:
$ tools/stats.sh
Number of remaining raw addresses:
   Referencing Home (0000-3FFF):
       0
   Referencing non-Home ROM banks (4000-7FFF):
    2551
   Referencing RAM (8000-FFFF):
    6478

Number of unlabeled functions:
    1033

Number of unlabeled jumps:
    7706
This should help to:
Get a sense of the project completion state;
Help to identify which banks are shiftable, and which still reference code or data using raw addresses.
In the future, the script may present percentages instead of raw numbers; something like “Unlabeled functions: 1033 (34%)”.
Shiftable bank
Speaking of shiftable banks, work has begun towards making the disassembly shiftable!
But what’s a shiftable disassembly? When starting a disassembling project, the first step is often to run an automatic disassembler on the whole ROM binary. This automatic disassembler can only decode instructions, and add auto-generated-labels to the most obvious locations. But the output is quite limited: it will have data interpreted as code, no meaningful labels – and, crucially, many memory addresses will be left unresolved.
; Loading data from an unresolved `$4206` address.ldhl,$4206lda,[hl]
What’s the problem with that? Well, if we start tweaking the original code (for instance to add a new feature that wasn’t present in the original game), the new code will slightly push the old code around. But places in the code using unresolved addresses won’t be updated, and will still point to the former location. This will lead to data-corruption and crashes very quickly.
How to avoid these corruptions? Either by:
Making sure that new code never shifts the old code around. This is usually what ROM-hackers do, by inserting carefully crafted jumps to the new code – and it’s very cumbersome.
Or make the reverse-engineered source code shiftable, so that new code can be added anywhere without issues.
In shiftable code, all unresolved raw addresses have been resolved to proper labels. Because of that, even if the data location is pushed around by new code, the code referencing this data location will also change – and the game will still work.
; Loading data from a labeled address.ldhl,Data_004_4206lda,[hl]
Now, resolving data addresses in the whole reconstructed source code isn’t easy. There’s a reason disassemblers can’t do it automatically: the banks system.
When the disassembler sees, for instance, a pointer being created with the address $4206, it can’t know if this address means:
”$4206 in the current bank”,
or “$4206 in bank 3”,
or even “$4206 in bank 2 or 3 depending on the color mode”.
So cross-referencing these addresses has to be made manually. An human must understand what the code is actually trying to do, and replace the raw address with a label at the right location. And it takes time.
But already, as a first milestone, the main bank (bank 0) is now shiftable! That means new code can be added or removed from this bank, without breaking the game. As the bank 0 is always mapped into memory, this is already quite useful to insert some hooks for new features.
 Each 2x2 section of the Overworld map declares its own tileset ID. (Credits: Xkeeper)
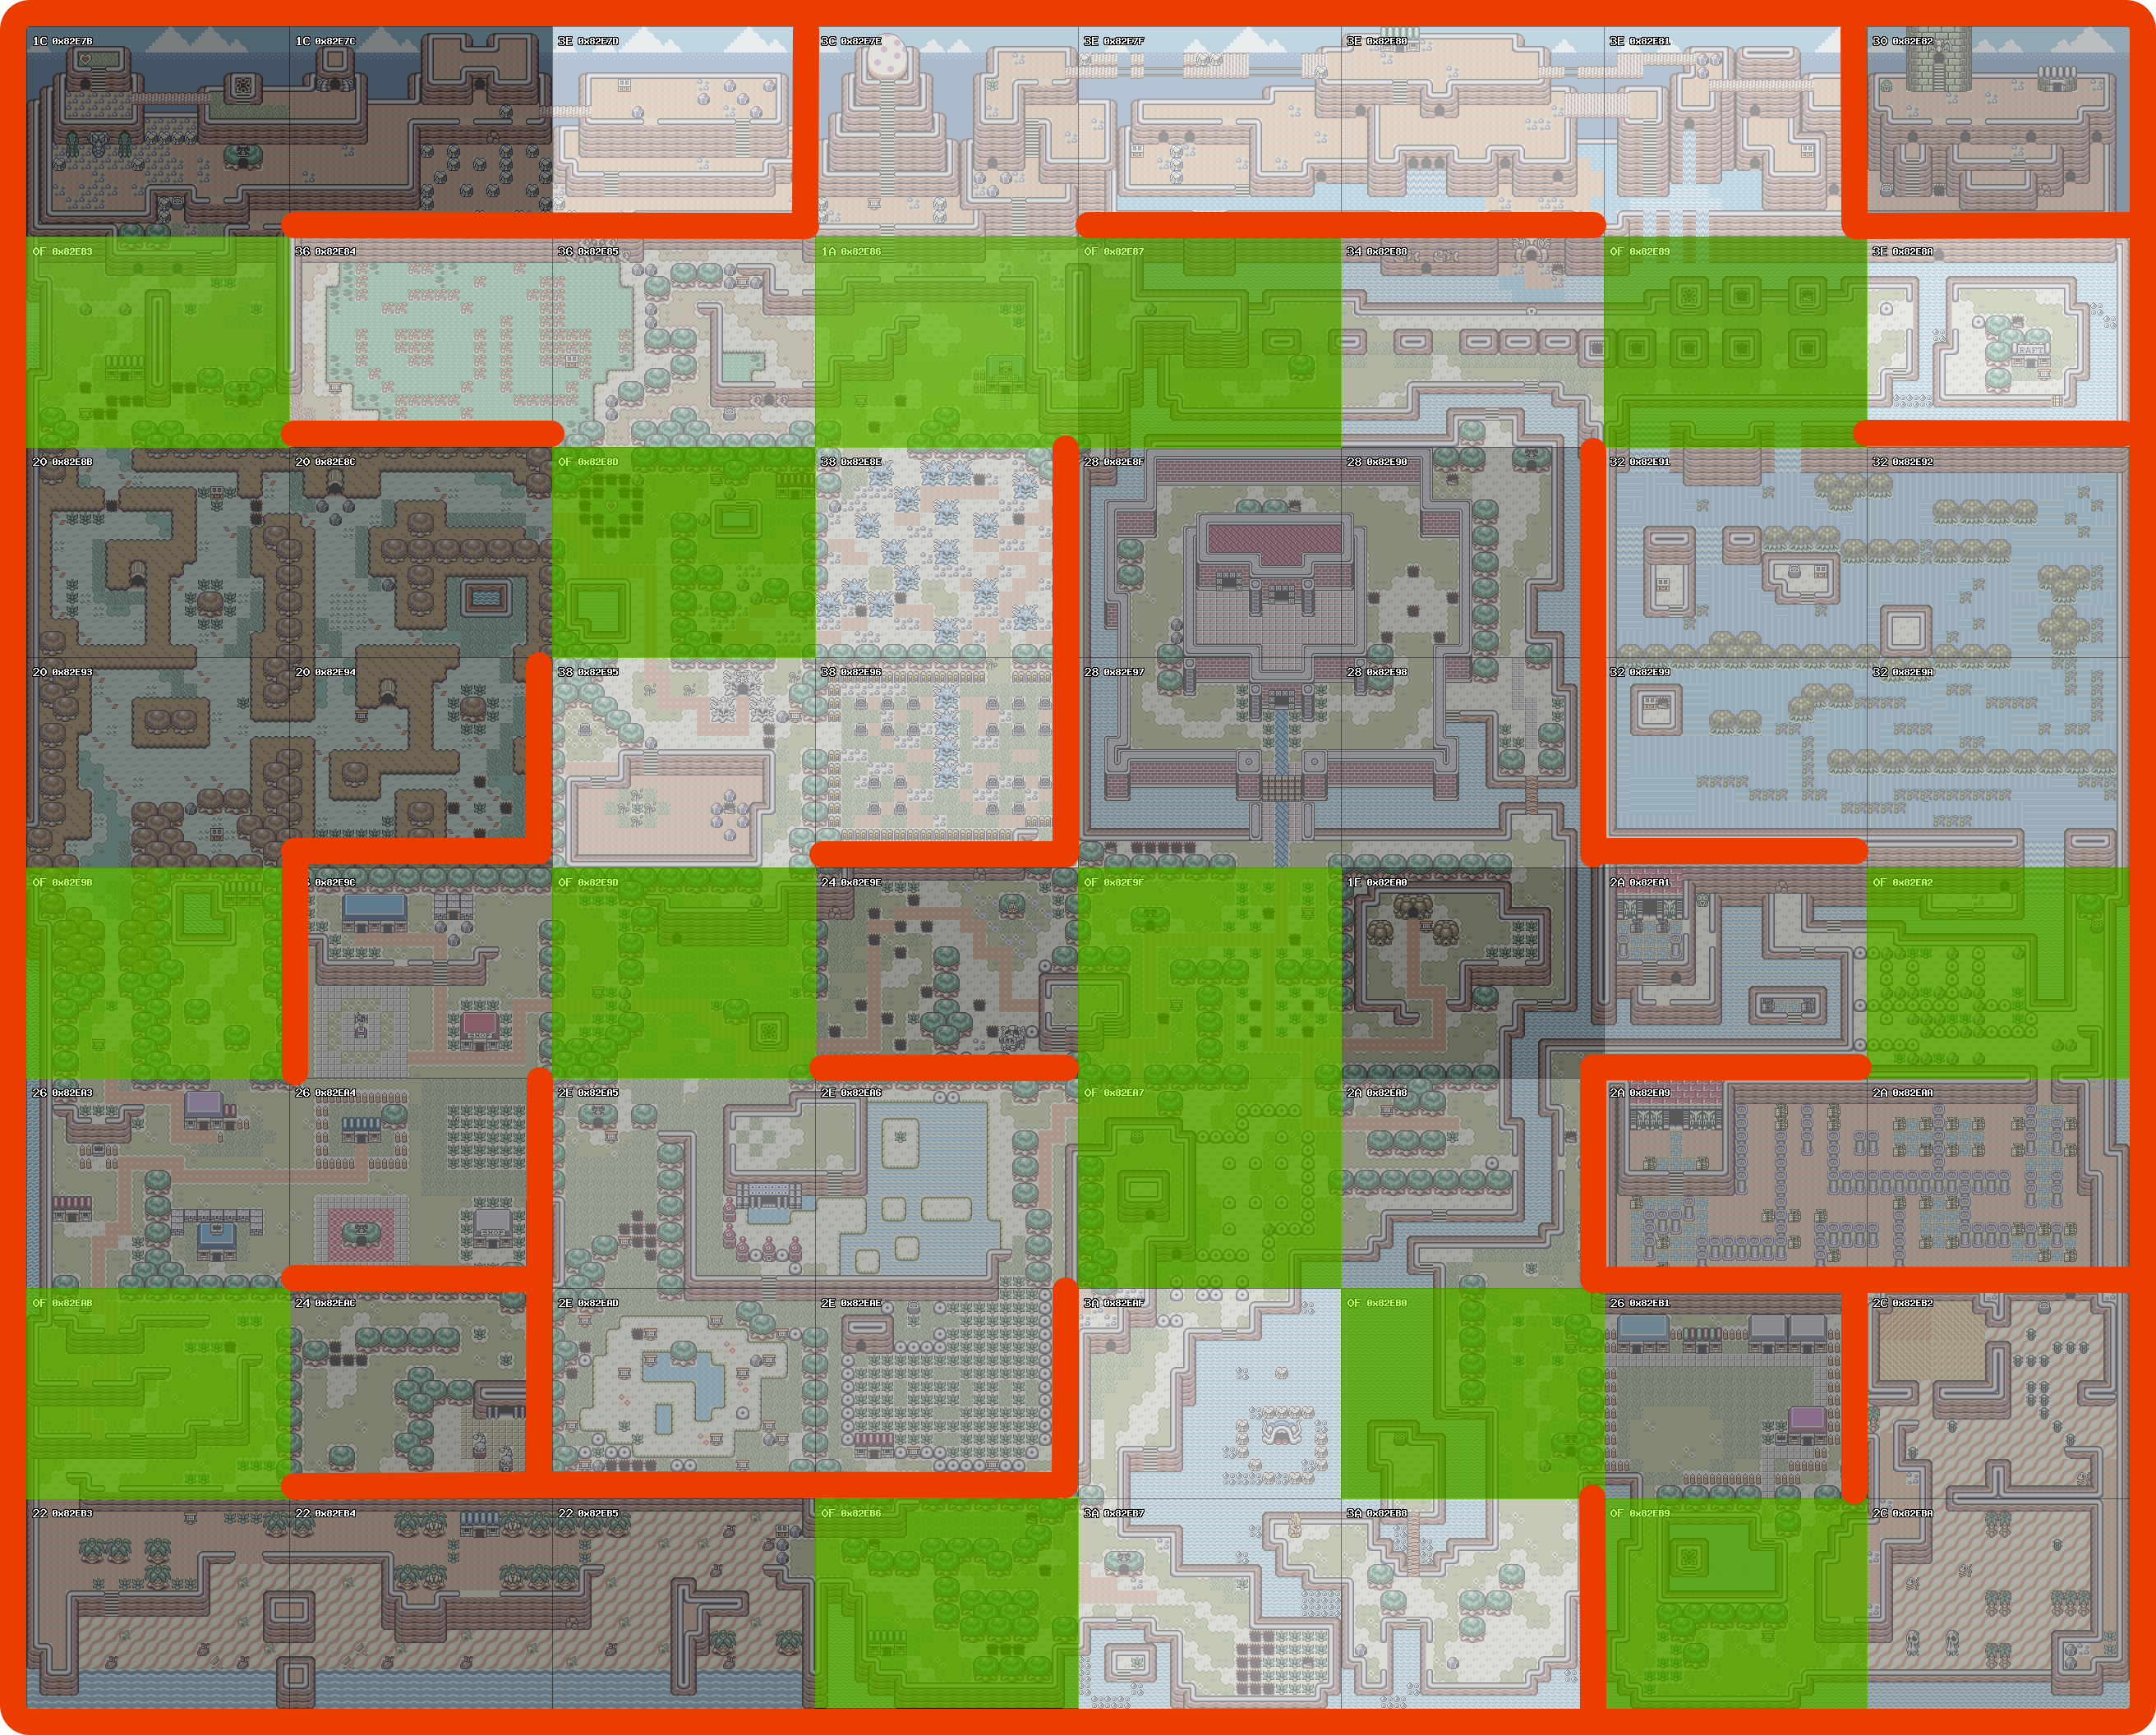 Overworld map of Link’s Awakening. In green: the “Keep current tilesets. In red: walls and natural obstacles on the map.